

Planet Python
Last update: September 08, 2020 07:48 AM UTC
September 07, 2020
Podcast.__init__
Digging Into Dagster: An Opinionated Open Source Framework For Data Orchestration
Data applications are complex and continually evolving, often requiring collaboration across multiple teams. In order to keep everyone on the same page a high level abstraction is needed to facilitate a cross-cutting view of the data orchestration across integration, transformation, analytics, and machine learning. Dagster is an innovative new framework that leans on the power and flexibility of Python to provide an extensible interface to the complete lifecycle of data projects. In this episode Nick Schrock explains how he designed the Dagster project to allow for integration with the entire data ecosystem while providing an opinionated structure for connecting the different stages of computation. He also discusses how he is working to grow an open ecosystem around the Dagster project, and his thoughts on building a sustainable business on top of it without compromising the integrity of the community. This was a great conversation about playing the long game when building a business while providing a valuable utility to a complex problem domain.
Summary
Data applications are complex and continually evolving, often requiring collaboration across multiple teams. In order to keep everyone on the same page a high level abstraction is needed to facilitate a cross-cutting view of the data orchestration across integration, transformation, analytics, and machine learning. Dagster is an innovative new framework that leans on the power and flexibility of Python to provide an extensible interface to the complete lifecycle of data projects. In this episode Nick Schrock explains how he designed the Dagster project to allow for integration with the entire data ecosystem while providing an opinionated structure for connecting the different stages of computation. He also discusses how he is working to grow an open ecosystem around the Dagster project, and his thoughts on building a sustainable business on top of it without compromising the integrity of the community. This was a great conversation about playing the long game when building a business while providing a valuable utility to a complex problem domain.
Announcements
- Hello and welcome to Podcast.__init__, the podcast about Python and the people who make it great.
- When you’re ready to launch your next app or want to try a project you hear about on the show, you’ll need somewhere to deploy it, so take a look at our friends over at Linode. With the launch of their managed Kubernetes platform it’s easy to get started with the next generation of deployment and scaling, powered by the battle tested Linode platform, including simple pricing, node balancers, 40Gbit networking, dedicated CPU and GPU instances, and worldwide data centers. Go to pythonpodcast.com/linode and get a $60 credit to try out a Kubernetes cluster of your own. And don’t forget to thank them for their continued support of this show!
- This portion of Python Podcast is brought to you by Datadog. Do you have an app in production that is slower than you like? Is its performance all over the place (sometimes fast, sometimes slow)? Do you know why? With Datadog, you will. You can troubleshoot your app’s performance with Datadog’s end-to-end tracing and in one click correlate those Python traces with related logs and metrics. Use their detailed flame graphs to identify bottlenecks and latency in that app of yours. Start tracking the performance of your apps with a free trial at pythonpodcast.com/datadog. If you sign up for a trial and install the agent, Datadog will send you a free t-shirt.
- You listen to this show to learn and stay up to date with the ways that Python is being used, including the latest in machine learning and data analysis. For more opportunities to stay up to date, gain new skills, and learn from your peers there are a growing number of virtual events that you can attend from the comfort and safety of your home. Go to pythonpodcast.com/conferences to check out the upcoming events being offered by our partners and get registered today!
- Your host as usual is Tobias Macey and today I’m interviewing Nick Schrock about Dagster, an open source data orchestrator for powering data engineering, analytics, and machine learning
Interview
- Introductions
- How did you get introduced to Python?
- Can you start by describing what Dagster is and how it got started?
- What are the most common difficulties that organizations face when working with data projects?
- How does Dagster help in addressing those challenges?
- There are a number of workflow orchestration platforms, spanning a few generations of tooling. What do you see as the defining characteristics of the various options, and how does Dagster fit in that ecosystem?
- What are the assumptions that you made at the start of building Dagster and how have they been challenged, updated, or invalidated over the past year of working with end users?
- How are the internals of Dagster implemented?
- How has the design changed or evolved since you first began working on it?
- For someone who is building on top of Dagster, what is their workflow from first steps through to production?
- What are your guiding principles for desigining the user facing API?
- What are the available extension points for Dagster?
- What was your reason for implementing Dagster as a Python framework?
- With the benefit of hindsight, would you make the same decision today?
- What are some of the most interesting, innovative, or unexpected ways that you have seen Dagster used?
- What are the most interesting, unexpected, or challenging lessons that you have learned while building Dagster and working to grow its ecosystem?
- When is Dagster the wrong choice?
- As you continue to build Dagster, what is your vision for it and its ecosystem?
- What are the next steps that you are taking to achieve that vision?
Keep In Touch
Picks
Closing Announcements
- Thank you for listening! Don’t forget to check out our other show, the Data Engineering Podcast for the latest on modern data management.
- Visit the site to subscribe to the show, sign up for the mailing list, and read the show notes.
- If you’ve learned something or tried out a project from the show then tell us about it! Email hosts@podcastinit.com) with your story.
- To help other people find the show please leave a review on iTunes and tell your friends and co-workers
- Join the community in the new Zulip chat workspace at pythonpodcast.com/chat
Links
- Dagster
- Elementl
- IronPython
- Fluent Python
- GraphQL
- Maslow’s Hierarchy of Needs
- Hierarchy of Data Needs
- DAG == Directed Acyclic Graph
- Informatica
- Airflow
- Luigi
- Dagster Config Schema
- Dask
- gRPC
- MyPy
- Data Lineage
- Pandas
- Amundsen
- DataHub
- Gatsby.js
- Panama Papers
- Mode Analytics
- Papermill
- DBT
- Databricks
- Tobias’ Dagster Repository
The intro and outro music is from Requiem for a Fish The Freak Fandango Orchestra / CC BY-SA
September 07, 2020 10:35 PM UTC
Test and Code
129: How to Test Anything - David Lord
I asked people on twitter to fill in "How do I test _____?" to find out what people want to know how to test.
Lots of responses. David Lord agreed to answer them with me.
In the process, we come up with lots of great general advice on how to test just about anything.
Specific Questions people asked:
- What makes a good test?
- How do you test web app performance?
- How do you test cookie cutter templates?
- How do I test my test framework?
- How do I test permission management?
- How do I test SQLAlchemy models and pydantic schemas in a FastAPI app?
- How do I test warehouse ETL code?
- How do I test and mock GPIO pins on hardware for code running MicroPython on a device?
- How do I test PyQt apps?
- How do I test web scrapers?
- Is it the best practice to put static html in your test directory or just snippets stored in string variables?
- What's the best way to to test server client API contracts?
- How do I test a monitoring tool?
We also talk about:
- What is the Flask testing philosophy?
- What do Flask tests look like?
- Flask and Pallets using pytest
- Code coverage
Some of the resulting testing strategies:
- Set up some preconditions. Run the function. Get the result.
- Don't test external services.
- Do test external service failures.
- Don't test the frameworks you are using.
- Do test your use of a framework.
- Use open source projects to learn how something similar to your project tests things.
- Focus on your code.
- Focus on testing your new code.
- Try to architect your application such that actual GUI testing is minimal.
- Split up a large problem into smaller parts that are easier to test.
- Nail down as many parts as you can.
Special Guest: David Lord.
Sponsored By:
- Datadog: Modern monitoring & security. See inside any stack, any app, at any scale, anywhere. Visit testandcode.com/datadog to get started.
- Talk Python Training: Online video courses for Python developers
Support Test & Code : Python Testing for Software Engineering
<p>I asked people on twitter to fill in "How do I test _____?" to find out what people want to know how to test.<br> Lots of responses. David Lord agreed to answer them with me.<br> In the process, we come up with lots of great general advice on how to test just about anything.</p> <p>Specific Questions people asked:</p> <ul> <li>What makes a good test?</li> <li>How do you test web app performance?</li> <li>How do you test cookie cutter templates?</li> <li>How do I test my test framework? </li> <li>How do I test permission management?</li> <li>How do I test SQLAlchemy models and pydantic schemas in a FastAPI app?</li> <li>How do I test warehouse ETL code?</li> <li>How do I test and mock GPIO pins on hardware for code running MicroPython on a device?</li> <li>How do I test PyQt apps?</li> <li>How do I test web scrapers?</li> <li>Is it the best practice to put static html in your test directory or just snippets stored in string variables?</li> <li>What's the best way to to test server client API contracts?</li> <li>How do I test a monitoring tool?</li> </ul> <p>We also talk about:</p> <ul> <li>What is the Flask testing philosophy?</li> <li>What do Flask tests look like?</li> <li>Flask and Pallets using pytest</li> <li>Code coverage </li> </ul> <p>Some of the resulting testing strategies:</p> <ul> <li>Set up some preconditions. Run the function. Get the result.</li> <li>Don't test external services.</li> <li>Do test external service failures.</li> <li>Don't test the frameworks you are using.<br></li> <li>Do test your use of a framework.</li> <li>Use open source projects to learn how something similar to your project tests things.</li> <li>Focus on your code.</li> <li>Focus on testing your new code. </li> <li>Try to architect your application such that actual GUI testing is minimal.</li> <li>Split up a large problem into smaller parts that are easier to test.</li> <li>Nail down as many parts as you can.</li> </ul><p>Special Guest: David Lord.</p><p>Sponsored By:</p><ul><li><a href="/sitelet?url=https%3A%2F%2Ftestandcode.com%2Fdatadog" rel="nofollow">Datadog</a>: <a href="/sitelet?url=https%3A%2F%2Ftestandcode.com%2Fdatadog" rel="nofollow">Modern monitoring & security. See inside any stack, any app, at any scale, anywhere. Visit testandcode.com/datadog to get started.</a></li><li><a href="/sitelet?url=https%3A%2F%2Ftalkpython.fm%2Ftest" rel="nofollow">Talk Python Training</a>: <a href="/sitelet?url=https%3A%2F%2Ftalkpython.fm%2Ftest" rel="nofollow">Online video courses for Python developers</a></li></ul><p><a href="/sitelet?url=https%3A%2F%2Fwww.patreon.com%2Ftestpodcast" rel="payment">Support Test & Code : Python Testing for Software Engineering</a></p>September 07, 2020 06:00 PM UTC
Codementor
Klotski Adventure — Part 2
If you want play and feel klotski. www.schoolarchimedes.com Now,to get shortest solution is no brainer, just use BFS. ``` starttime = time.time() vis = set() par = {b: None} q =...
September 07, 2020 03:04 PM UTC
Klotski Adventure — Part 1
How solving Klotski puzzle lead to finding algorithmic AI solution for AiFactory's MoveIt game.
September 07, 2020 02:53 PM UTC
Real Python
Video Subtitles & Transcripts Now Available on Real Python
Hey there,
I’ve got a big update to share today:
Real Python video courses now have full subtitles and transcripts!
I think this is going to do a lot for accessibility and making your favorite Python learning resources easier to review & more searchable.
Let’s do a quick demo. Video lessons now come with full subtitles that you can turn on and off at your convenience:

Below each video you’ll also find an interactive transcript that animates along with the video to show you what section of the video is currently playing:
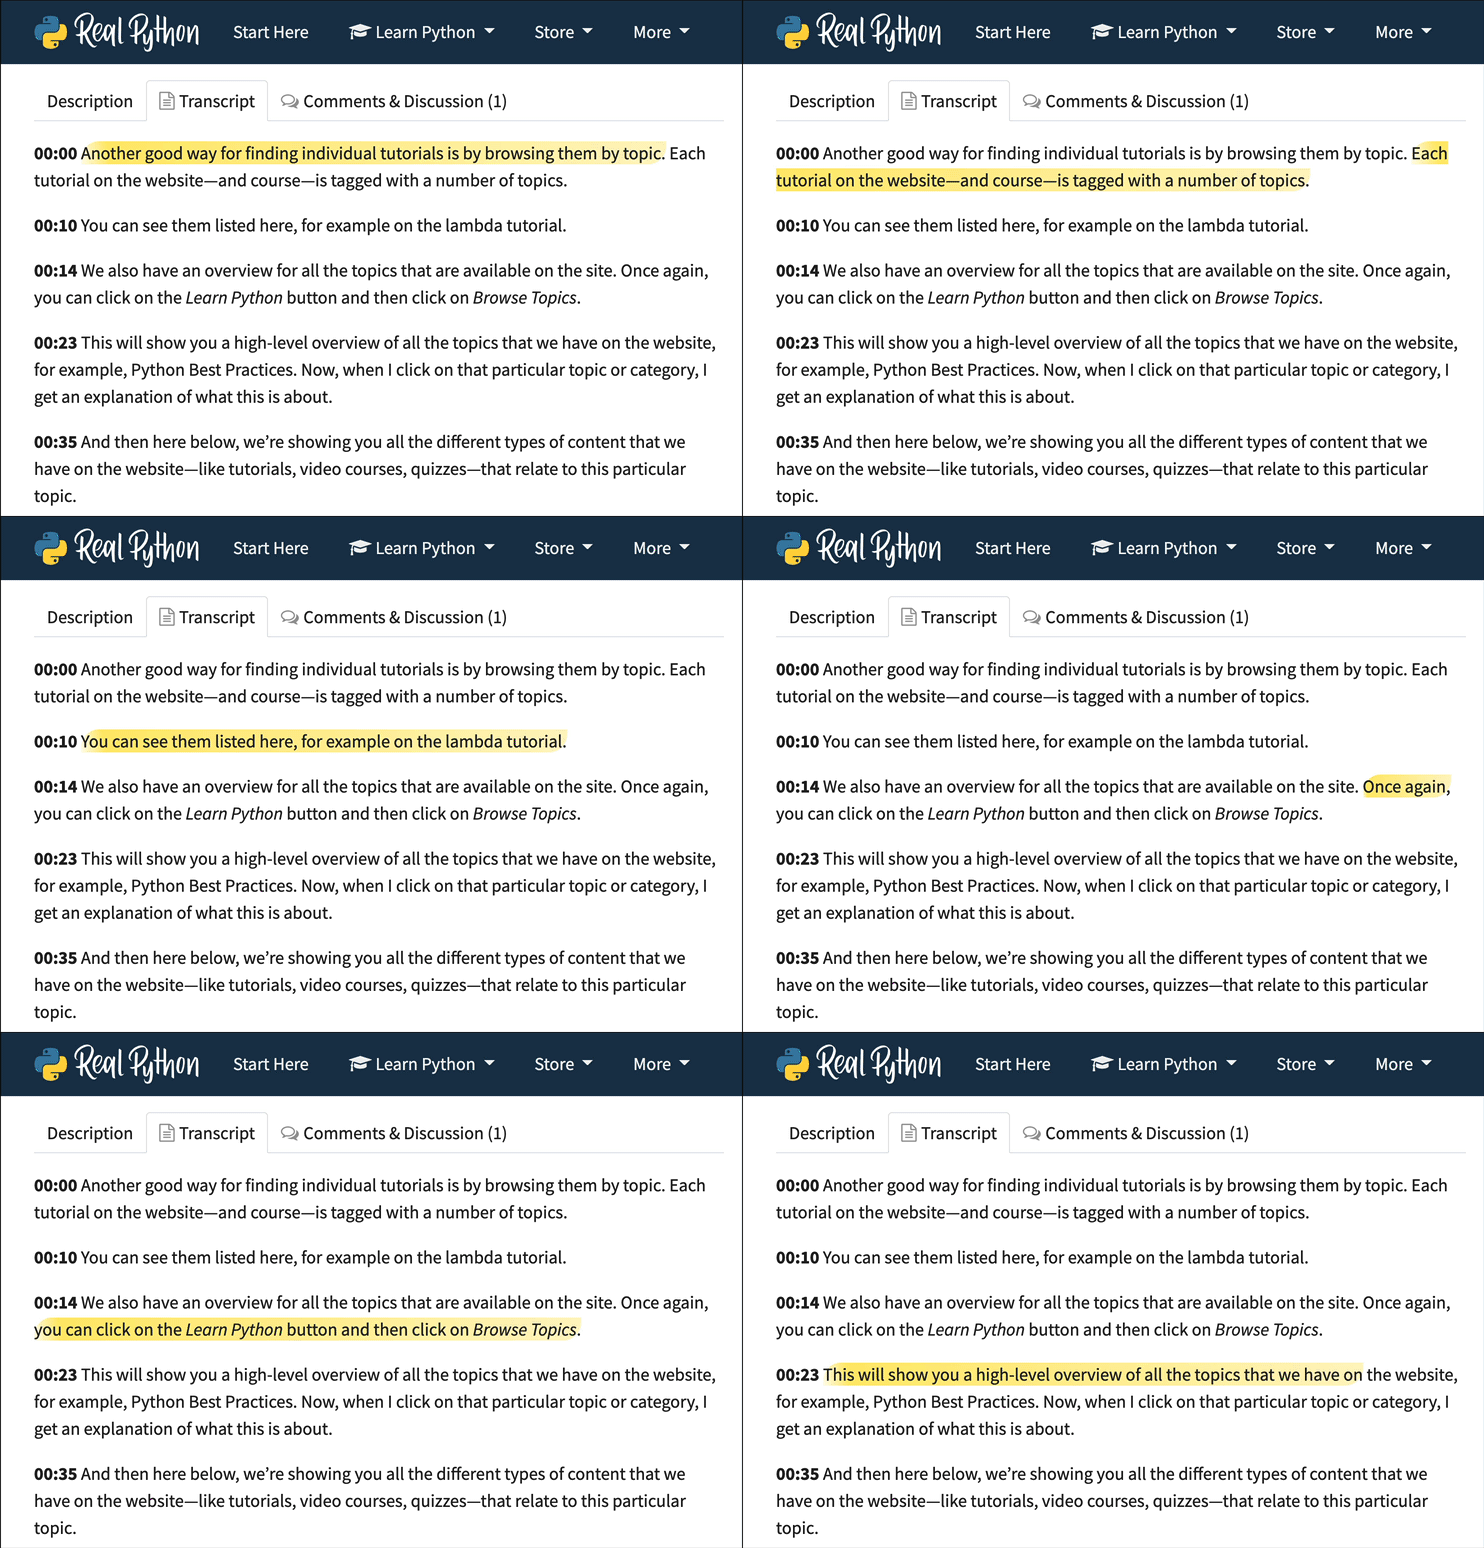
Read the full article at https://realpython.com/video-subtitles-transcripts-now-available/ »
[ Improve Your Python With 🐍 Python Tricks 💌 – Get a short & sweet Python Trick delivered to your inbox every couple of days. >> Click here to learn more and see examples ]
September 07, 2020 02:00 PM UTC
Abhijeet Pal
Python callable() Explained
In programming, a callable is something that can be called. In Python, a callable is anything that can be called, using parentheses and maybe with some arguments. Functions, Generators, and Classes are inherently callable in Python. The callable() method takes an object and returns a boolean. True – if the object is callable False – if the object is not callable The callable() method checks if the object is either of the two – An instance of a class with a __call__ method Is of a type that has a which indicates callability such as in functions, classes, etc. or has a non-null tp_call (c struct) member. Since functions are callable in Python. def my_function(): print("Hi, I'm a function") callable(my_function) Output True This indicates that every time we create a function, Python creates a callable object for it. You can also verify the presence of __call__ attribute. my_function.__call__ Output <method-wrapper '__call__' of function object at 0x7f08706d5840> Similarly for a Class, class MyClass(): def my_method(self): print("Hi, I am a class method") callable(MyClass) Output True However, if you create an object and …
The post Python callable() Explained appeared first on Django Central.
September 07, 2020 06:42 AM UTC
Mike Driscoll
PyDev of the Week: Nathan Epstein
This week we welcome Nathan Epstein (@epstein_n) as our PyDev of the Week! Nathan has given talks on various subjects all over the world. He has also written articles for Dev.to, Codewords and more.
Let’s take a few moments to get to know Nathan better!
Can you tell us a little about yourself (hobbies, education, etc):
I studied applied math at Columbia for both undergrad and grad school. In my free time, I listen to lectures and read a lot; particularly topics within the social sciences.
Other hobbies include music composition, blitz chess, hiking, and biking.
Why did you start using Python?
Scientific computing. The ease of use, readability, and library ecosystem makes it a great choice for so many tasks within that space.
What other programming languages do you know and which is your favorite?
To varying degrees, I also know R, JavaScript, C, C++, C#, Ruby, and Scala.
Of those, I think C++ is my favorite. It offers a really nice balance of low-level control and ease of use. But my overall favorite is Python.
What projects are you working on now?
Outside of work, I’m collaborating with some friends on a computational biology paper and playing around with procedurally generated music.
Which Python libraries are your favorite (core or 3rd party)?
Some pretty typical stuff for data science and ML. Pandas, scikit-learn, NumPy, Keras, TensorFlow. For “big data”, Spark and MLlib.
I see you have done lots of talks. How did you get started doing that?
I got into giving talks through side projects. I figured if something is sufficiently interesting for me to spend time on it, it’s probably interesting to some other folks as well.
Do you have any advice for other people who would like to get into giving talks?
If you have ideas you’re interested in sharing, don’t hesitate to submit a proposal. A surprisingly large number of conferences are happy to work with first time speakers.
Is there anything else you’d like to say?
I’m a big believer in the importance of scientific computing. To that end, I’d love to recommend that people consider supporting some combination of the Python Software Foundation, the R Foundation, NumFOCUS, and Code Nation.
Thanks for doing the interview, Nathan!
The post PyDev of the Week: Nathan Epstein appeared first on The Mouse Vs. The Python.
September 07, 2020 05:05 AM UTC
Techiediaries - Django
Run your Python Unit Tests with GitHub Actions
In this tutorial, we'll learn how to automatically run your Python unit tests using GitHub Actions.
We'll see how to set up a GitHub Actions workflow that install Python 3.6 inside a Ubuntu system along with our project's dependencies e.g. pytest and finnaly run the unit tests after pushing our code to a GitHub repository.
Let's see how to automate running unit tests when making a commit and pushing your code to GitHub or when making a pull request.
Thanks to GitHub Actions it's now easier than before without using any external services and they even provide a good free tier.
This will allow you to spot the right commit(s) that broke your code.
We'll be using Python 3, and we will be working in a virtual environment. This is a good practice for Python to isolate system packages from our project's package. Even if this is a small example but should be a practice that you need to always follow.
Let's start by creating and activating a virtual environment for our project, by running the following commands:
$ mkdir pytestexample
$ cd pytestexample
$ python3 -m venv .env
This will create a virtual environment called .env in our project's folder.
Next, we need to activate this virtual environment using the following command:
$ source .env/bin/activate
Next, let’s install pytest in our project's virtual environment using the following command:
$ pip install pytest
Setting up A Python Project with PyTest
We'll be using pytest for testing.
It can be installed using the following command inside your virtual environment:
$ pip install pytest
Pytest expects our tests to be located in files whose names begin with
test_or end with_test.py.
Next, go ahead and add some tests:
Next, we'll create a file named test_capitalize.py, next add the following Python code:
# test_capitalize.py

def capitalize_string(s):
    return s.capitalize()
Next, we'll need to write a test. We need prefix the test function name with test_, since this is what pytest expects:
# test_capitalize.py

def capitalize_string(s):
    if not isinstance(s, str):
        raise TypeError('Please provide a string')
    return s.capitalize()

def test_capitalize_string():
    assert capitalize_string('test') == 'Test'
You can run the test, by running the following command:
$ pytest
Finally, we need to create a requirements.txt file using the following command:
$ pip freeze > requirements.txt
Now that we made sure that our example is running locally with this simple example, let's set up a GitHub Actions workflow for automatically running the test(s) when our code is pushed to GitHub.
Setting up a GitHub Actions Workflow
You can create a workflow by creating a YAML file inside the .github/workflows/ci.yml folder.
Next, open the file and add the following content:
name: Run Python Tests
on:
  push:
    branches:
      - master
  pull_request:
    branches:
      - master

jobs:
  build:
    runs-on: ubuntu-latest
    steps:
      - uses: actions/checkout@v2
      - name: Install Python 3
        uses: actions/setup-python@v1
        with:
          python-version: 3.6
      - name: Install dependencies
        run: |
          python -m pip install --upgrade pip
          pip install -r requirements.txt
      - name: Run tests with pytest
        run: pytest
This workflow is named Run Python Tests. it will be started when pushing or pulling code from the master branch of our repository. It contains one job named build with four steps which will run inside a Ubuntu runner.
We first give the workflow access to the code of the repository using the checkout@v2 action. Next, we add a step named Install Python 3 which makes use of the setup-python@v1 action to install Python 3.6. Next, we add a step that will install the dependencies of our project in Ubuntu. Finally we add a step for running our tests using pytest.
Now you simply need to run the following commands to commit and push to GitHub repository and wait for your tests to automatically run:
$ git add -A
$ git commit -m "First commit"
$ git push origin master
Conclusion
In this tutorial, we've seen how to use a GitHub Actions workflow to automate running your Python tests with Pytest.
September 07, 2020 12:00 AM UTC
September 06, 2020
Techiediaries - Django
VS Code: Automatically Organize Python Imports
In this quick tip, we'll see how to configure VS Code to automatically organize Python imports upon saving your source code files.
VS Code: Automatically Organize Python Imports
You can configure VS Code to automatically sort and organize Python imports upon saving files.
First need to install the isort package system-wide using the following command:
$ pipenv install isort --dev
Open the settings using ⇧⌘P or Ctrl+Shift+P, next search for Preferences: Configure Language Specific Settings.... Press Enter and then search for Python. In the settings.json file that will be opened, add the following settings:
"[python]": {
    "editor.codeActionsOnSave": {
        "source.organizeImports": true
    }
}
Now upon saving files with the .py extension, VS Code will automatically sort and organize the imports.
September 06, 2020 12:00 AM UTC
September 05, 2020
Doug Hellmann
sphinxcontrib-spelling 5.4.0
sphinxcontrib-spelling is a spelling checker for Sphinx-based documentation. It uses PyEnchant to produce a report showing misspelled words. Release Date: 2020-09-05 New Features Added a new filter (sphinxcontrib.spelling.filters.ContributorFilter) that treats contributor names extracted from the git history as spelled correctly, making it easier to refer to the names in acknowledgments . Includes a new configuration …
Continue reading "sphinxcontrib-spelling 5.4.0"
September 05, 2020 03:17 PM UTC
Weekly Python StackOverflow Report
(ccxli) stackoverflow python report
These are the ten most rated questions at Stack Overflow last week.
Between brackets: [question score / answers count]
Build date: 2020-09-05 13:21:31 GMT
- Why doesn't Python give any error when quotes around a string do not match? - [27/3]
- Django, python3, on install I get: "Parent module 'setuptools' not loaded" - [13/5]
- Error Using Drive Mount with Google Colab - [10/2]
- How to terminate loop.run_in_executor with ProcessPoolExecutor gracefully? - [9/1]
- Create date range list with pandas - [9/1]
- Efficiently finding consecutive streaks in a pandas DataFrame column? - [8/4]
- Dataframe from API to CSV - [8/1]
- Data manipulation in Pandas: create a boolean column from values on column then fill with value from yet another column - [8/1]
- .predict() runs only on CPU even though GPU is available - [7/2]
- Replace all consecutive repeated letters ignoring specific words - [7/2]
September 05, 2020 01:22 PM UTC
Talk Python to Me
#280 Python and AI in Journalism
If there has ever been a time in history that journalism is needed to shine a light on what's happening in the world, it's now. Would it surprise you to hear that Python and machine learning are playing an increasingly important role in discovering and bringing us the news? On this episode, you'll meet Carolyn Stansky, a journalist and developer who's been researching this intersection.<br/> <br/> <strong>Links from the show</strong><br/> <br/> <div><b>Carolyn on Twitter</b>: <a href="/sitelet?url=https%3A%2F%2Ftwitter.com%2Fcarolstran" target="_blank" rel="noopener">@carolstran</a><br/> <b>Carolyn on LinkedIn</b>: <a href="/sitelet?url=https%3A%2F%2Fwww.linkedin.com%2Fin%2Fcarolstran%2F" target="_blank" rel="noopener">linkedin.com</a><br/> <b>Carolyn's site</b>: <a href="/sitelet?url=https%3A%2F%2Fworkwithcarolyn.com%2F" target="_blank" rel="noopener">workwithcarolyn.com</a><br/> <b>Carolyn's talk: How AI is enhancing journalism</b>: <a href="/sitelet?url=https%3A%2F%2Fvimeo.com%2F369290633" target="_blank" rel="noopener">vimeo.com</a><br/> <br/> <b>Examples of AI / automation in use</b><br/> <b>Quakebot</b>: <a href="/sitelet?url=https%3A%2F%2Fbit.ly%2Fquakebot-code" target="_blank" rel="noopener">bit.ly/quakebot-code</a><br/> <b>LA Homicide Tracker</b>: <a href="/sitelet?url=http%3A%2F%2Fhomicide.latimes.com%2F" target="_blank" rel="noopener">homicide.latimes.com</a><br/> <b>reportermate</b>: <a href="/sitelet?url=https%3A%2F%2Fgithub.com%2Fnickjevershed%2FReportermate-Lib" target="_blank" rel="noopener">github.com</a><br/> <b>Buzzfeed Finding and tracking secret spy planes</b>: <a href="/sitelet?url=https%3A%2F%2Fbit.ly%2Fbuzzfeed-spy-planes" target="_blank" rel="noopener">bit.ly/buzzfeed-spy-planes</a><br/> <b>NY Times comment moderation</b>: <a href="/sitelet?url=https%3A%2F%2Fbit.ly%2Fnyt-comments" target="_blank" rel="noopener">bit.ly/nyt-comments</a><br/> <b>Al Jazzira: Drones in warzones</b>: <a href="/sitelet?url=https%3A%2F%2Fbit.ly%2Ffmls-keynote" target="_blank" rel="noopener">bit.ly/fmls-keynote</a><br/> <br/> <b>Tools</b><br/> <b>Qz.ai - Quartz AI Studio, focused on helping smaller papers and journalists</b>: <a href="/sitelet?url=https%3A%2F%2Fqz.ai%2F" target="_blank" rel="noopener">qz.ai</a><br/> <b>Facets</b>: <a href="/sitelet?url=https%3A%2F%2Fpair-code.github.io%2Ffacets%2F" target="_blank" rel="noopener">github.io</a><br/> <b>Google News Initiative</b>: <a href="/sitelet?url=https%3A%2F%2Fbit.ly%2Fgoogle-ni" target="_blank" rel="noopener">bit.ly/google-ni</a><br/> <br/> <b>Newspaper3k Package</b>: <a href="/sitelet?url=https%3A%2F%2Fnewspaper.readthedocs.io%2Fen%2Flatest%2F" target="_blank" rel="noopener">newspaper.readthedocs.io</a><br/> <b>FiveThirtyEight</b>: <a href="/sitelet?url=https%3A%2F%2Ffivethirtyeight.com%2Ftag%2Fjournalism%2F" target="_blank" rel="noopener">fivethirtyeight.com</a><br/> <b>Google News and Australia fight</b>: <a href="/sitelet?url=https%3A%2F%2Fwww.bbc.com%2Fnews%2Ftechnology-53806489" target="_blank" rel="noopener">bbc.com</a><br/> <b>Twitter thread on American news overwhelming other countries</b>: <a href="/sitelet?url=https%3A%2F%2Ftwitter.com%2Fjelenajansson%2Fstatus%2F1298118830976360449" target="_blank" rel="noopener">twitter.com</a><br/></div><br/> <strong>Sponsors</strong><br/> <br/> <a href='/sitelet?url=https%3A%2F%2Ftalkpython.fm%2Fbrilliant'>Brilliant</a><br> <a href='/sitelet?url=https%3A%2F%2Ftalkpython.fm%2Ftraining'>Talk Python Training</a>
September 05, 2020 08:00 AM UTC
Python Bytes
#197 Structured concurrency in Python
<p>Sponsored by us! Support our work through:</p> <ul> <li>Our <a href="/sitelet?url=https%3A%2F%2Ftraining.talkpython.fm%2F"><strong>courses at Talk Python Training</strong></a></li> <li><a href="/sitelet?url=https%3A%2F%2Ftestandcode.com%2F">Test & Code</a> Podcast</li> </ul> <p><strong>Michael #1:</strong> <a href="/sitelet?url=https%3A%2F%2Fmattwestcott.co.uk%2Fblog%2Fstructured-concurrency-in-python-with-anyio"><strong>Structured concurrency in Python with AnyIO</strong></a></p> <ul> <li><a href="/sitelet?url=https%3A%2F%2Fgithub.com%2Fagronholm%2Fanyio">AnyIO</a> is a Python library providing structured concurrency primitives on top of asyncio.</li> <li><strong>Structured concurrency</strong> is a <a href="/sitelet?url=https%3A%2F%2Fen.wikipedia.org%2Fwiki%2FProgramming_paradigm">programming paradigm</a> aimed at improving the clarity, quality, and development time of a <a href="/sitelet?url=https%3A%2F%2Fen.wikipedia.org%2Fwiki%2FComputer_program">computer program</a> by using a structured approach to <a href="/sitelet?url=https%3A%2F%2Fen.wikipedia.org%2Fwiki%2FConcurrent_computing">concurrent programming</a>. The core concept is the encapsulation of concurrent threads of execution (here encompassing kernel and userland threads and processes) by way of control flow constructs that have clear entry and exit points and that ensure all spawned threads have completed before exit. — Wikipedia</li> <li>The best overview is <a href="/sitelet?url=https%3A%2F%2Fvorpus.org%2Fblog%2Fnotes-on-structured-concurrency-or-go-statement-considered-harmful%2F">Notes on structured concurrency</a> by Nathaniel Smith (or his <a href="/sitelet?url=https%3A%2F%2Fwww.youtube.com%2Fwatch%3Fv%3DoLkfnc_UMcE">video</a> if you prefer).</li> <li>Python has three well-known concurrency libraries built around the async/await syntax: <a href="/sitelet?url=https%3A%2F%2Fdocs.python.org%2F3%2Flibrary%2Fasyncio.html">asyncio</a>, <a href="/sitelet?url=https%3A%2F%2Fgithub.com%2Fdabeaz%2Fcurio">Curio</a>, and <a href="/sitelet?url=https%3A%2F%2Fgithub.com%2Fpython-trio%2Ftrio">Trio</a>. (WHERE IS <a href="/sitelet?url=https%3A%2F%2Fasherman.io%2Fprojects%2Funsync.html">unsync</a>?!?! 🙂 )</li> <li>Since it's the default, the overwhelming majority of async applications and libraries are written with asyncio.</li> <li>The second and third are attempts to improve on asyncio, by David Beazley and Nathaniel Smith respectively</li> <li>The <a href="/sitelet?url=https%3A%2F%2Fgithub.com%2Fagronholm%2Fanyio">AnyIO</a> library by Alex Grönholm describes itself as follows: > an asynchronous compatibility API that allows applications and libraries written against it to run unmodified on asyncio, curio and trio.</li> </ul> <p>Example:</p> <pre><code> import anyio async def task(n): await anyio.sleep(n) async def main(): try: async with anyio.create_task_group() as tg: await tg.spawn(task, 1) await tg.spawn(task, 2) finally: # e.g. release locks print('cleanup') anyio.run(main) </code></pre> <ul> <li>AnyIO also provides other primitives to replace the native asyncio ones if you want to benefit from structured concurrency's cancellation semantics:</li> <li><a href="/sitelet?url=https%3A%2F%2Fanyio.readthedocs.io%2Fen%2Flatest%2Fsynchronization.html">Synchronisation primitives (locks, events, conditions)</a></li> <li><a href="/sitelet?url=https%3A%2F%2Fanyio.readthedocs.io%2Fen%2Flatest%2Fstreams.html">Streams (similar to queues)</a></li> <li><a href="/sitelet?url=https%3A%2F%2Fanyio.readthedocs.io%2Fen%2Flatest%2Fapi.html%23timeouts-and-cancellation">Timeouts (e.g.</a> <code>[move_on_after](https://anyio.readthedocs.io/en/latest/api.html#timeouts-and-cancellation)</code><a href="/sitelet?url=https%3A%2F%2Fanyio.readthedocs.io%2Fen%2Flatest%2Fapi.html%23timeouts-and-cancellation">,</a> <code>[fail_after](https://anyio.readthedocs.io/en/latest/api.html#timeouts-and-cancellation)</code><a href="/sitelet?url=https%3A%2F%2Fanyio.readthedocs.io%2Fen%2Flatest%2Fapi.html%23timeouts-and-cancellation">)</a></li> <li><a href="/sitelet?url=https%3A%2F%2Fanyio.readthedocs.io%2Fen%2Flatest%2Fapi.html">... and more</a></li> </ul> <p><strong>Brian #2:</strong> <a href="/sitelet?url=https%3A%2F%2Fdata-apis.org%2Fblog%2Fannouncing_the_consortium%2F"><strong>The Consortium for Python Data API Standards</strong></a></p> <ul> <li>One unintended consequence of the advances in multiple frameworks for data science, machine learning, deep learning and numerical computing is fragmentation and differences in common function signatures.</li> <li>The Consortium for Python Data API Standards aims to tackle this fragmentation by developing API standards for arrays (a.k.a. tensors) and dataframes. </li> <li>They intend to work with library maintainers and the community and have a review process.</li> <li>One example of the problem, “mean”. Five different interfaces over 8 frameworks:</li> </ul> <pre><code> numpy: mean(a, axis=None, dtype=None, out=None, keepdims=[HTML_REMOVED]) dask.array: mean(a, axis=None, dtype=None, out=None, keepdims=[HTML_REMOVED]) cupy: mean(a, axis=None, dtype=None, out=None, keepdims=False) jax.numpy: mean(a, axis=None, dtype=None, out=None, keepdims=False) mxnet.np: mean(a, axis=None, dtype=None, out=None, keepdims=False) sparse: s.mean(axis=None, keepdims=False, dtype=None, out=None) torch: mean(input, dim, keepdim=False, out=None) tensorflow: reduce_mean(input_tensor, axis=None, keepdims=None, name=None, reduction_indices=None, keep_dims=None) </code></pre> <ul> <li>They are going to start with array API</li> <li>Then dataframes</li> <li>Also, it’s happening fast, hoping to make traction in next few months.</li> </ul> <p><strong>Michael #3:</strong> <a href="/sitelet?url=https%3A%2F%2Fswitowski.com%2Fblog%2Fask-for-permission-or-look-before-you-leap"><strong>Ask for Forgiveness or Look Before You Leap?</strong></a></p> <ul> <li>via PyCoders</li> <li>Think C++ style vs Python style of error handling </li> <li>Or any exception-first/only language vs. some hybrid thing</li> <li>If you “look before you leap”, you first check if everything is set correctly, then you perform an action.</li> <li>Example:</li> </ul> <pre><code> from pathlib import Path if Path("/path/to/file").exists(): ... </code></pre> <ul> <li>With “ask for forgiveness,” you don’t check anything. You perform whatever action you want, but you wrap it in a <code>try/catch</code> block.</li> </ul> <pre><code> try: with open("path/to/file.txt", "r") as input_file: return input_file.read() except IOError: # Handle the error or just ignore it </code></pre> <ul> <li>Their example, “Look before you leap” is around 30% slower (155/118≈1.314). Testing for subclass basically with no errors</li> <li>But if there are errors: The tables have turned. “Ask for forgiveness” is now over <strong>four times</strong> as slow as “Look before you leap” (562/135≈4.163). That’s because this time, our code throws an exception. And <strong>handling exceptions is expensive</strong>.</li> <li>If you expect your code to fail often, then “Look before you leap” might be much faster.</li> <li>Michael’s counter example: <a href="/sitelet?url=https%3A%2F%2Fgist.github.com%2Fmikeckennedy%2F00828db1d49d2cd2dac8fa0295e54c23">gist.github.com/mikeckennedy/00828db1d49d2cd2dac8fa0295e54c23</a></li> </ul> <p><strong>Brian #4:</strong> <a href="/sitelet?url=https%3A%2F%2Fmyrepos.branchable.com%2F"><strong>myrepos</strong></a></p> <ul> <li>“You have a lot of version control repositories. Sometimes you want to update them all at once. Or push out all your local changes. You use special command lines in some repositories to implement specific workflows. Myrepos provides a <code>mr</code> command, which is a tool to manage all your version control repositories.”</li> <li>Run <code>mr register</code> for all repos under a shared directory.</li> <li>Then be able to do common operations on a subtree of repos, like <code>mr status</code>, <code>mr update</code>, <code>mr diff</code>, or really anything.</li> <li>See also: <a href="/sitelet?url=https%3A%2F%2Fadamj.eu%2Ftech%2F2020%2F04%2F02%2Fmaintaining-multiple-python-projects-with-myrepos%2F"><strong>Maintaining Multiple Python Projects With myrepos</strong></a> <strong>-</strong> Adam Johnson</li> </ul> <p><strong>Michael #5:</strong> <a href="/sitelet?url=https%3A%2F%2Fpythonspeed.com%2Farticles%2Fofficial-python-docker-image%2F"><strong>A deep dive into the official Docker image for Python</strong></a></p> <ul> <li>by <a href="#">Itamar Turner-Trauring</a>, via PyCoders</li> <li>Wait, there’s <a href="/sitelet?url=https%3A%2F%2Fhub.docker.com%2F_%2Fpython">an official Docker image</a> for Python</li> <li>The base image is Debian GNU/Linux 10, the current stable release of the Debian distribution, also known as Buster because Debian names all their releases after characters from Toy Story</li> <li>Next, environment variables are added: <code>ENV PATH /usr/local/bin:$PATH</code></li> <li>Next, the locale is set: <code>ENV LANG C.UTF-8</code> </li> <li>There’s also an environment variable that tells you the current Python version: <code>ENV PYTHON_VERSION 3.8.5</code> </li> <li>In order to run, Python needs some additional packages (the dreaded certificates, etc)</li> <li>Next, a compiler toolchain is installed, Python source code is downloaded, Python is compiled, and then the unneeded Debian packages are uninstalled. Interestingly, The packages—<code>gcc</code> and so on—needed to compile Python are removed once they are no longer needed.</li> <li>Next, <code>/usr/local/bin/python3</code> gets an alias <code>/usr/local/bin/python</code>, so you can call it either way</li> <li>the <code>Dockerfile</code> makes sure to include that newer <code>pip</code></li> <li>Finally, the Dockerfile specifices the entrypoint: <code>CMD ["python3"]</code> Means docker run launches into the REPL:</li> </ul> <pre><code> $ docker run -it python:3.8-slim-buster Python 3.8.5 (default, Aug 4 2020, 16:24:08) [GCC 8.3.0] on linux Type "help", "copyright", "credits" or "license" for more information. >>> </code></pre> <p><strong>Brian #6:</strong> <strong>“Only in a Pandemic” section</strong> <a href="/sitelet?url=https%3A%2F%2Fwww.ethanrosenthal.com%2F2020%2F08%2F25%2Foptimal-peanut-butter-and-banana-sandwiches%2F"><strong>nannernest: Optimal Peanut Butter and Banana Sandwiches</strong></a></p> <ul> <li>Ethan Rosenthal</li> <li>Computer vision, deep learning, machine learning, and Python come together to make sandwiches.</li> <li>Just a really fun read about problems called “nesting” or “packing” and how to apply it to banana slices and bread.</li> </ul> <p>Extras:</p> <p>Brian:</p> <ul> <li><a href="/sitelet?url=https%3A%2F%2Fwww.patreon.com%2Fpythonbytes">Patreon link</a></li> </ul> <p>Michael:</p> <ul> <li>Sign up for the free <a href="/sitelet?url=https%3A%2F%2Fwww.crowdcast.io%2Fe%2Ftips-and-techniques-to-move-from-excel-to-python">Excel to Python webcast on Sept 29</a>.</li> <li>Check out the early access version of <a href="/sitelet?url=https%3A%2F%2Ftalkpython.fm%2Fmem">the memory course</a>.</li> </ul> <p>Joke</p> <p>via <a href="/sitelet?url=https%3A%2F%2Ftwitter.com%2FEduardoOrochena%2Fstatus%2F1291427366867263489">Eduardo Orochena</a></p> <p><img src="/sitelet?url=https%3A%2F%2Fpaper-attachments.dropbox.com%2Fs_5445676B90B80E929E8439B748DE93536CF760170EF956F45AA1F48A2AD952B3_1598468369037_EelADOtWkAEVZ6o.png" alt="" /></p>
September 05, 2020 08:00 AM UTC
Python Insider
Python 3.5.10 is now available
Python 3.5.10 is now available. You can get it here.
September 05, 2020 04:54 AM UTC
Techiediaries - Django
How to Delete Local/Remote Git Branches
If you have previously worked with Git for versioning your Angular code, there is a good chance that you had some situation where you wanted to delete a remote branch or multiple branches. This happens many times to developers, particularly in large projects.
In this article, we'll learn:
- How to delete a local branch in your Git repository,
- How to delete a remote branch in Git,
- How to delete all Git branches which have been merged,
- How to remove all local branches not on remote,
- How to delete all your local Git branches except master.
Before tackling how to delete a remote branch, we’ll first see how to delete a branch in the local Git repository.
Note: Version control systems are an indispensable tool in modern web development that can help you solve many issues related to every task. Git is one of the most popular version control systems nowadays.
Before we proceed to learn how to delete local and remote branches in Git, let's define what's a Git branch and the side effects of deleting branches.
A branch in Git is a pointer to a commit. If you delete a branch, it deletes the pointer to the commit. This means if you delete a branch which is not yet merged and the commits become unreachable by any other branch or tag, the Git garbage collection will eventually remove the unreachable commits.
Deleting Local Branches
Let's start by learning how to delete a local branch.
- First, use the
git branch -acommand to display all branches (both local and remote). - Next, you can delete the local branch, using the
git branch -dcommand, followed by the name of the branch you want to delete.
$ git branch -a

# *master # b1 # remote/origin/master # remote/origin/b1
$ git branch -d b1 # Deleted branch b1.
Note: You can also use the
-Dflag which is equivalent to the--delete --forcecommand instead of-d. This will enable you to delete the local branch regardless of its merge status.
Deleting Remote Branches
Unlike local branches, you can't delete a remote branch using the git branch command. However, you need to use the git push --delete command, followed by the name of the branch you want to delete. You also need to specify the remote name (origin in this case) after git push.
$ git branch -a

# *master
# b1
# remote/origin/master
# remote/origin/b1

$ git push origin --delete b1
# [...]
# - [deleted] b1
How Can You Delete All Non-Merged Git Branches?
Now that we have seen how can you delete local and remote branches in your Git repositories, let's suppose you have multiple Git branches. How can you delete the branches which have already been merged? At once instead of deleting them branch by branch.
Note: Merging is performed using the
git mergecommand and it simply means integrating changes from another branch.
First, you need to get all the branches that are merged in the remote repository using the following command:
$ git branch --merged
If you have one merged branch, you can simply delete the merged local branch using the following command:
$ git branch -d branch-name
If you want to delete it from the remote repository use the following command:
$ git push --delete origin branch-name
Remove All Local Branches not on Remote
You can remove all local branches not on the remote repository, you can use the following bash command:
$ git branch -r | egrep -v -f /dev/fd/0 <(git branch -vv | grep origin) | xargs git branch -d
Let's break this command:
- First we get all remote branches using the
git branch -rcommand - Next, we get the local branches not on the remote using the
egrep -v -f /dev/fd/0 <(git branch -vv | grep origin)command, - Finally we delete the branches using the
xargs git branch -dcommand.
grep is a command-line utility for searching plain-text data sets for lines that match a regular expression. Its name comes from the ed command g/re/p (globally search for a regular expression and print matching lines), which has the same effect. grep was originally developed for the Unix operating system, but later available for all Unix-like systems and some others such as OS-9.
xargs (short for "eXtended ARGuments") is a command on Unix and most Unix-like operating systems used to build and execute commands from standard input. It converts input from standard input into arguments to a command.
Delete All Your Local Git Branches Except Master
If you have finished with local Git branches, it's usually a good practice to remove them to free their space. You can simply run the following command:
$ git branch | grep -v "master" | xargs git branch -D
We use the grep -v "master" command to search for branches except the master then we delete them using the git branch -D command.
Conclusion
Throughout this article, we've seen how you can delete remote and local branches from your Git repositories. We've learned:
- How to delete a local branch in your Git repository,
- How to delete a remote branch in Git,
- How to delete all Git branches which have been merged,
- How to remove all local branches not on remote,
- How to delete all your local Git branches except master.
September 05, 2020 12:00 AM UTC
Using Comments in JSON with Node.js and JavaScript Examples
In this article, we'll learn how to use comments in JSON files. We'll see workarounds and methods used by developers to add single-line and multiple-line comments to their JSON files, the external libraries and packages for stripping comments from your files before feeding them to the regular JSON.parse() method in JavaScript and Node.js and we'll also see simple JavaScript code for removing comments without external libraries. Finally, we'll see the alternative formats to JSON that support comments such as JSON5 and JSONC.
JSON Doesn't Support Comments!
As you might be aware of, JSON doesn't support comments! But as programmers, we are used to add comments so in this article, we'll see the possible ways that we have to use comments in our JSON files even if they are natively supported by the format.
In fact, comments were not always missing in JSON but were removed later.
This is the reason of removing comments from JSON as stated by Douglas Crockford.
I removed comments from JSON because I saw people were using them to hold parsing directives, a practice which would have destroyed interoperability.
JSON can be mostly needed if you use JSON for your configuration files even if JSON in the first place wasn't designed for this purpose but for exchanging data but, we see it nowadays used as a configuration format in many apps.
For example the tsconfig.json file which is the configuration file for TypeScript does allow comments, see microsoft/TypeScript#4987.
You also can use comments to comment out values in your data files when testing instead of removing them.
As developers we tend always to find a solution for our problems and in case of JSON comments, we also have solutions, let's explore it.
Adding Comments As JSON Data Attributes
Since JSON is a text-based format for storing and exchaning data using key-value pairs, we can actually use comments as data pairs.
For example, this a simple JSON data:
{
   "name": "Product 1",
   "cost": "10USD",
   "count": 100
}
We could simply add a designated data element called "__comment":
{
   "__comment": "This is a comment!",
   "name": "Product 1",
   "cost": "10USD",
   "count": 100
}
We use the underscore as a convention to differentiate comments from the rest of data, from the first glance, even if the name of key explicitly tells that it's a comment but still it can be a good convention to avoid any collisions since we may vary well have valid data keys with the same name.
Please note that since JSON format doesn't support comments anymore, they will be parsed and processed just like any other JSON data in your applications.
Parsing JSON with JavaScript and Node.js
For example, if we use Node.js to parse a products.json file with the previous JSON data:
const fs = require('fs');
const path = require('path');

let data = fs.readFileSync(path.resolve(__dirname, 'product.json'));
let product = JSON.parse(data);
console.log(product["__comment"]); // Output: This is a comment!
The __comment key and its value were parsed into the JSON object and can be accessed by the key name just like the other JSON data.
Adding Multiple-Line Comments in JSON
You can also use the following format for adding multiple-line comments in JSON:
{
  "//": "This is a comment",
  "//": "This is a second comment"
}
It's used in the Google Firebase documentation.
Since JSON and strictly-linted JavaScript don't allow duplicate keys of values, you can add a unique letter or number to make it validate:
{
    "//a": "This is the first comment.",
    "//b": "This is the second second."
}
See this gist for more details.
You can also add multiple comments as follows:
{
    "Comments": [
        "First comment,",
        "Second comment"
    ]
}
Adding Comments in JSON with External Tools
We can also create tools that pre-process JSON files and remove comments from our files before parsing them with JSON libraries so we don't get parsing errors.
This allows us the possibility to use comments in any form we want and avoid adding them as data. For example, we can use the popular comments form found in many C-style programming languages. For example:
// This is a comment
/* This is a comment */
{
   "name": "Product 1",
   "cost": "10USD",
   "count": 100
}
Popular tools that helps you remove comments from your JSON files before parsing them include:
- Google's GYP supports #-style comments,
- JSON.minify will help you discard C/C++ style comments with JavaScript/Node.js,
- JSMin is a minification tool for JavaScript that removes comments and unnecessary whitespace from JavaScript files but can be used for JSON files,
- Hjson: a user interface for JSON that allows you to use comments to document your data inline. You can also use them to comment out values when testing,
- strip-json-comments: It will replace single-line comments
//and multi-line comments/**/with whitespace. This allows JSON error positions to remain as close as possible to the original source. Also available as a Gulp/Grunt/Broccoli plugin, - comment-json: Parse and stringify JSON with comments in JavaScript/Node.js. It will retain comments even after saved!
- nlohmann/json: A JSON parser for modern C++ that provides optional support for ignoring comments on parsing. As stated by the creator of JSON, it's okay to add comments to your JSON data as long as you use a tool to strip them before parsing the file:
Suppose you are using JSON to keep configuration files, which you would like to annotate. Go ahead and insert all the comments you like. Then pipe it through JSMin before handing it to your JSON parser. - Douglas Crockford, 2012.
JSON5 Supports Comments
The JSON5 Data Interchange Format (JSON5) is a superset of JSON that aims to alleviate some of the limitations of JSON by expanding its syntax to include some productions from ECMAScript 5.1.
This is an example of valid JSON5 data:
{
  // comments
  unquoted: 'and you can quote me on that',
  singleQuotes: 'I can use "double quotes" here',
  lineBreaks: "Look, Mom! \
No \\n's!",
  hexadecimal: 0xdecaf,
  leadingDecimalPoint: .8675309, andTrailing: 8675309.,
  positiveSign: +1,
  trailingComma: 'in objects', andIn: ['arrays',],
  "backwardsCompatible": "with JSON",
}
This is how can be installed and used:
npm install json5;
const JSON5 = require('json5');
JSON5.parseJSON();
JSON Schema Supports Comments
JSON Schema is a vocabulary that allows you to annotate and validate JSON documents.
The $comment keyword is strictly intended for adding comments to the JSON schema source. See reference
JSONC: JSON with Comments Proposal
Jsonc is a simplified json format which allows comments and unquoted values delimited by whitespace. A jsonc formatted file can be transformed to a json file. Comments will be stripped out and quotes added.
Jsonc is used as an alternative format in many IDEs that use JSON. For example, Visual Studio Code allows you to set JSONC instead of JSON:
"files.associations": {
  "*.master": "html",
  "*.json": "jsonc"
}
Parsing Comments in JSON with JavaScript and Node.js
If you need a simple solution for adding comments to JSON file without using any external libraries, you can pre-parse the file before parsing them with the actual JSON modules. For example, you can use the following JavaScript code:
const stripJSONComments = (data) => {
  var re = new RegExp("\/\/(.*)","g");
  return data.replace(re,'');
}

var jsonData = fs.readFileSync(fileName,'utf8');
jsonData = stripJSONComments(jsonData);
var jsonObject = JSON.parse(jsonData);
We first first reads the JSON file in a variable. Next, it makes use of a regular expression to remove the single-line comments i.e “//” from the file, and finally parses the JSON syntax using the JSON.parse() method. You can modify the regular to support multiple-line comments.
Conclusion
JSON doesn't support comments by design. But as we can see from practice, in many situations developers tend to use comments following various tricks, and conventions and even using libraries and plugins that pre-parse JSON files and remove any comments before feeding the output to the regular JSON parser. Comments are also natively supported in many super-set formats of JSON such as JSON5, and YAML, etc.
September 05, 2020 12:00 AM UTC
Removing Comments from JSON with Python
JSON doesn't permit comments by design. As explained by its creator Douglas Crockford.
I removed comments from JSON because I saw people were using them to hold parsing directives, a practice which would have destroyed interoperability.
But he also stated that you can use external or built-in tools to pre-parse JSON files and remove any comments before the actual parsing takes place.
In this short article, we'll see how you can remove comments from JSON files using Python code.
How to Read JSON Files with Python
First, we need to be able to read JSON files in our Python code:
import json

with open('example.json') as json_file:
    data = json.load(json_file)
        print(data)
How to Remove Comments from your JSON File
There are various workarounds used by developers to add comments to JSON files generally.
You can use JS-style comments (single-line // and multiline /* .. */) in your JSON files and pre-parse them with your Python code to remove the comments before reading them in the previous way:
import json

with open('data.json', 'r') as jsonfile:
    jsondata = ''.join(line for line in jsonfile if not line.startswith('//'))
    data = json.loads(jsondata)

print(data)
You can also use external packages such as:
- JSON-minify: A port of the JSON-minify utility to the Python language to minify blocks of JSON-like content into valid JSON by removing all whitespace and JS-style comments (single-line // and multi-line /* .. */). With JSON-minify, you can maintain developer-friendly JSON documents, but minify them before parsing or transmitting them over-the-wire. Can be installed using the
pip install JSON-minifycommand, - commentjson: A Python package that helps you create JSON files with Python and JavaScript style inline comments. Its API is very similar to the Python standard library's json module. You can install it using the
pip install commentjsoncommand.
This is an example using:
import commentjson

with open('data.json', 'r') as file:
    ata = commentjson.load(file)

print(data)
This is another example from the docs:
>>> import commentjson
>>>
>>> json_string = """{
...     "name": "Vaidik Kapoor", # Person's name
...     "location": "Delhi, India", // Person's location
...
...     # Section contains info about
...     // person's appearance
...     "appearance": {
...         "hair_color": "black",
...         "eyes_color": "black",
...         "height": "6"
...     }
... }"""
>>>
>>> json_loaded = commentjson.loads(json_string)
>>> print json_loaded
{u'appearance': {u'eyes_color': u'black', u'hair_color': u'black', u'height': u'6'}, u'name': u'Vaidik Kapoor', u'location': u'Delhi, India'}
September 05, 2020 12:00 AM UTC
Ahmed Bouchefra
How to Delete Local/Remote Git Branches
If you have previously worked with Git for versioning your Angular code, there is a good chance that you had some situation where you wanted to delete a remote branch or multiple branches. This happens many times to developers, particularly in large projects.
In this article, we’ll learn:
- How to delete a local branch in your Git repository,
- How to delete a remote branch in Git,
- How to delete all Git branches which have been merged,
- How to remove all local branches not on remote,
- How to delete all your local Git branches except master.
Before tackling how to delete a remote branch, we’ll first see how to delete a branch in the local Git repository.
Note: Version control systems are an indispensable tool in modern web development that can help you solve many issues related to every task. Git is one of the most popular version control systems nowadays.
Before we proceed to learn how to delete local and remote branches in Git, let’s define what’s a Git branch and the side effects of deleting branches.
A branch in Git is a pointer to a commit. If you delete a branch, it deletes the pointer to the commit. This means if you delete a branch which is not yet merged and the commits become unreachable by any other branch or tag, the Git garbage collection will eventually remove the unreachable commits.
Deleting Local Branches
Let’s start by learning how to delete a local branch.
- First, use the
git branch -acommand to display all branches (both local and remote). - Next, you can delete the local branch, using the
git branch -dcommand, followed by the name of the branch you want to delete.
$ git branch -a

# *master # b1 # remote/origin/master # remote/origin/b1
$ git branch -d b1 # Deleted branch b1.
Note: You can also use the
-Dflag which is equivalent to the--delete --forcecommand instead of-d. This will enable you to delete the local branch regardless of its merge status.
Deleting Remote Branches
Unlike local branches, you can’t delete a remote branch using the git branch command. However, you need to use the git push --delete command, followed by the name of the branch you want to delete. You also need to specify the remote name (origin in this case) after git push.
$ git branch -a

# *master
# b1
# remote/origin/master
# remote/origin/b1

$ git push origin --delete b1
# [...]
# - [deleted] b1
How Can You Delete All Non-Merged Git Branches?
Now that we have seen how can you delete local and remote branches in your Git repositories, let’s suppose you have multiple Git branches. How can you delete the branches which have already been merged? At once instead of deleting them branch by branch.
Note: Merging is performed using the
git mergecommand and it simply means integrating changes from another branch.
First, you need to get all the branches that are merged in the remote repository using the following command:
$ git branch --merged
If you have one merged branch, you can simply delete the merged local branch using the following command:
$ git branch -d branch-name
If you want to delete it from the remote repository use the following command:
$ git push --delete origin branch-name
Remove All Local Branches not on Remote
You can remove all local branches not on the remote repository, you can use the following bash command:
$ git branch -r | egrep -v -f /dev/fd/0 <(git branch -vv | grep origin) | xargs git branch -d
Let’s break this command:
- First we get all remote branches using the
git branch -rcommand - Next, we get the local branches not on the remote using the
egrep -v -f /dev/fd/0 <(git branch -vv | grep origin)command, - Finally we delete the branches using the
xargs git branch -dcommand.
grep is a command-line utility for searching plain-text data sets for lines that match a regular expression. Its name comes from the ed command g/re/p (globally search for a regular expression and print matching lines), which has the same effect. grep was originally developed for the Unix operating system, but later available for all Unix-like systems and some others such as OS-9.
xargs (short for “eXtended ARGuments”) is a command on Unix and most Unix-like operating systems used to build and execute commands from standard input. It converts input from standard input into arguments to a command.
Delete All Your Local Git Branches Except Master
If you have finished with local Git branches, it’s usually a good practice to remove them to free their space. You can simply run the following command:
$ git branch | grep -v "master" | xargs git branch -D
We use the grep -v "master" command to search for branches except the master then we delete them using the git branch -D command.
Conclusion
Throughout this article, we’ve seen how you can delete remote and local branches from your Git repositories. We’ve learned:
- How to delete a local branch in your Git repository,
- How to delete a remote branch in Git,
- How to delete all Git branches which have been merged,
- How to remove all local branches not on remote,
- How to delete all your local Git branches except master.
September 05, 2020 12:00 AM UTC
Using Comments in JSON with Node.js and JavaScript Examples
In this article, we’ll learn how to use comments in JSON files. We’ll see workarounds and methods used by developers to add single-line and multiple-line comments to their JSON files, the external libraries and packages for stripping comments from your files before feeding them to the regular JSON.parse() method in JavaScript and Node.js and we’ll also see simple JavaScript code for removing comments without external libraries. Finally, we’ll see the alternative formats to JSON that support comments such as JSON5 and JSONC.
JSON Doesn’t Support Comments!
As you might be aware of, JSON doesn’t support comments! But as programmers, we are used to add comments so in this article, we’ll see the possible ways that we have to use comments in our JSON files even if they are natively supported by the format.
In fact, comments were not always missing in JSON but were removed later.
This is the reason of removing comments from JSON as stated by Douglas Crockford.
I removed comments from JSON because I saw people were using them to hold parsing directives, a practice which would have destroyed interoperability.
JSON can be mostly needed if you use JSON for your configuration files even if JSON in the first place wasn’t designed for this purpose but for exchanging data but, we see it nowadays used as a configuration format in many apps.
For example the tsconfig.json file which is the configuration file for TypeScript does allow comments, see microsoft/TypeScript#4987.
You also can use comments to comment out values in your data files when testing instead of removing them.
As developers we tend always to find a solution for our problems and in case of JSON comments, we also have solutions, let’s explore it.
Adding Comments As JSON Data Attributes
Since JSON is a text-based format for storing and exchaning data using key-value pairs, we can actually use comments as data pairs.
For example, this a simple JSON data:
{
   "name": "Product 1",
   "cost": "10USD",
   "count": 100
}
We could simply add a designated data element called “__comment”:
{
   "__comment": "This is a comment!",
   "name": "Product 1",
   "cost": "10USD",
   "count": 100
}
We use the underscore as a convention to differentiate comments from the rest of data, from the first glance, even if the name of key explicitly tells that it’s a comment but still it can be a good convention to avoid any collisions since we may vary well have valid data keys with the same name.
Please note that since JSON format doesn’t support comments anymore, they will be parsed and processed just like any other JSON data in your applications.
Parsing JSON with JavaScript and Node.js
For example, if we use Node.js to parse a products.json file with the previous JSON data:
const fs = require('fs');
const path = require('path');

let data = fs.readFileSync(path.resolve(__dirname, 'product.json'));
let product = JSON.parse(data);
console.log(product["__comment"]); // Output: This is a comment!
The __comment key and its value were parsed into the JSON object and can be accessed by the key name just like the other JSON data.
Adding Multiple-Line Comments in JSON
You can also use the following format for adding multiple-line comments in JSON:
{
  "//": "This is a comment",
  "//": "This is a second comment"
}
It’s used in the Google Firebase documentation.
Since JSON and strictly-linted JavaScript don’t allow duplicate keys of values, you can add a unique letter or number to make it validate:
{
    "//a": "This is the first comment.",
    "//b": "This is the second second."
}
See this gist for more details.
You can also add multiple comments as follows:
{
    "Comments": [
        "First comment,",
        "Second comment"
    ]
}
Adding Comments in JSON with External Tools
We can also create tools that pre-process JSON files and remove comments from our files before parsing them with JSON libraries so we don’t get parsing errors.
This allows us the possibility to use comments in any form we want and avoid adding them as data. For example, we can use the popular comments form found in many C-style programming languages. For example:
// This is a comment
/* This is a comment */
{
   "name": "Product 1",
   "cost": "10USD",
   "count": 100
}
Popular tools that helps you remove comments from your JSON files before parsing them include:
- Google’s GYP supports #-style comments,
- JSON.minify will help you discard C/C++ style comments with JavaScript/Node.js,
- JSMin is a minification tool for JavaScript that removes comments and unnecessary whitespace from JavaScript files but can be used for JSON files,
- Hjson: a user interface for JSON that allows you to use comments to document your data inline. You can also use them to comment out values when testing,
- strip-json-comments: It will replace single-line comments
//and multi-line comments/**/with whitespace. This allows JSON error positions to remain as close as possible to the original source. Also available as a Gulp/Grunt/Broccoli plugin, - comment-json: Parse and stringify JSON with comments in JavaScript/Node.js. It will retain comments even after saved!
- nlohmann/json: A JSON parser for modern C++ that provides optional support for ignoring comments on parsing. As stated by the creator of JSON, it’s okay to add comments to your JSON data as long as you use a tool to strip them before parsing the file:
Suppose you are using JSON to keep configuration files, which you would like to annotate. Go ahead and insert all the comments you like. Then pipe it through JSMin before handing it to your JSON parser. - Douglas Crockford, 2012.
JSON5 Supports Comments
The JSON5 Data Interchange Format (JSON5) is a superset of JSON that aims to alleviate some of the limitations of JSON by expanding its syntax to include some productions from ECMAScript 5.1.
This is an example of valid JSON5 data:
{
  // comments
  unquoted: 'and you can quote me on that',
  singleQuotes: 'I can use "double quotes" here',
  lineBreaks: "Look, Mom! \
No \\n's!",
  hexadecimal: 0xdecaf,
  leadingDecimalPoint: .8675309, andTrailing: 8675309.,
  positiveSign: +1,
  trailingComma: 'in objects', andIn: ['arrays',],
  "backwardsCompatible": "with JSON",
}
This is how can be installed and used:
npm install json5;
const JSON5 = require('json5');
JSON5.parseJSON();
JSON Schema Supports Comments
JSON Schema is a vocabulary that allows you to annotate and validate JSON documents.
The $comment keyword is strictly intended for adding comments to the JSON schema source. See reference
JSONC: JSON with Comments Proposal
Jsonc is a simplified json format which allows comments and unquoted values delimited by whitespace. A jsonc formatted file can be transformed to a json file. Comments will be stripped out and quotes added.
Jsonc is used as an alternative format in many IDEs that use JSON. For example, Visual Studio Code allows you to set JSONC instead of JSON:
"files.associations": {
  "*.master": "html",
  "*.json": "jsonc"
}
Parsing Comments in JSON with JavaScript and Node.js
If you need a simple solution for adding comments to JSON file without using any external libraries, you can pre-parse the file before parsing them with the actual JSON modules. For example, you can use the following JavaScript code:
const stripJSONComments = (data) => {
  var re = new RegExp("\/\/(.*)","g");
  return data.replace(re,'');
}

var jsonData = fs.readFileSync(fileName,'utf8');
jsonData = stripJSONComments(jsonData);
var jsonObject = JSON.parse(jsonData);
We first first reads the JSON file in a variable. Next, it makes use of a regular expression to remove the single-line comments i.e “//” from the file, and finally parses the JSON syntax using the JSON.parse() method. You can modify the regular to support multiple-line comments.
This article was originally posted on https://www.techiediaries.com/json-comments/.
Conclusion
JSON doesn’t support comments by design. But as we can see from practice, in many situations developers tend to use comments following various tricks, and conventions and even using libraries and plugins that pre-parse JSON files and remove any comments before feeding the output to the regular JSON parser. Comments are also natively supported in many super-set formats of JSON such as JSON5, and YAML, etc.
September 05, 2020 12:00 AM UTC
Removing Comments from JSON with Python
JSON doesn’t permit comments by design. As explained by its creator Douglas Crockford.
I removed comments from JSON because I saw people were using them to hold parsing directives, a practice which would have destroyed interoperability.
But he also stated that you can use external or built-in tools to pre-parse JSON files and remove any comments before the actual parsing takes place.
In this short article, we’ll see how you can remove comments from JSON files using Python code.
How to Read JSON Files with Python
First, we need to be able to read JSON files in our Python code:
import json

with open('example.json') as json_file:
    data = json.load(json_file)
        print(data)
How to Remove Comments from your JSON File
There are various workarounds used by developers to add comments to JSON files generally.
You can use JS-style comments (single-line // and multiline /* .. */) in your JSON files and pre-parse them with your Python code to remove the comments before reading them in the previous way:
import json

with open('data.json', 'r') as jsonfile:
    jsondata = ''.join(line for line in jsonfile if not line.startswith('//'))
    data = json.loads(jsondata)

print(data)
You can also use external packages such as:
- JSON-minify: A port of the JSON-minify utility to the Python language to minify blocks of JSON-like content into valid JSON by removing all whitespace and JS-style comments (single-line // and multi-line /* .. */). With JSON-minify, you can maintain developer-friendly JSON documents, but minify them before parsing or transmitting them over-the-wire. Can be installed using the
pip install JSON-minifycommand, - commentjson: A Python package that helps you create JSON files with Python and JavaScript style inline comments. Its API is very similar to the Python standard library’s json module. You can install it using the
pip install commentjsoncommand.
This is an example using:
import commentjson

with open('data.json', 'r') as file:
    ata = commentjson.load(file)

print(data)
This is another example from the docs:
>>> import commentjson
>>>
>>> json_string = """{
...     "name": "Vaidik Kapoor", # Person's name
...     "location": "Delhi, India", // Person's location
...
...     # Section contains info about
...     // person's appearance
...     "appearance": {
...         "hair_color": "black",
...         "eyes_color": "black",
...         "height": "6"
...     }
... }"""
>>>
>>> json_loaded = commentjson.loads(json_string)
>>> print json_loaded
{u'appearance': {u'eyes_color': u'black', u'hair_color': u'black', u'height': u'6'}, u'name': u'Vaidik Kapoor', u'location': u'Delhi, India'}
September 05, 2020 12:00 AM UTC
September 04, 2020
Django Weblog
Technical Board Candidate Registration
As part of our change in governance with DEP-10 it is now time to collect candidates for the Django Technical Board.
According to DEP-10, "Any qualified person may register as a candidate; the candidate registration form and roster of candidates SHALL be maintained by the DSF Board, and candidates MUST provide evidence of their qualifications as part of registration. The DSF Board MAY challenge and reject the registration of candidates it believes do not meet the qualifications of members of the Technical Board, or who it believes are registering in bad faith."
To make this process as simple, but useful as possible, we are only requiring you to enter your name, email, and a bio/evidence of qualifications. There are optional fields for your Github, Twitter, and website which can be useful for evaluating your qualifications.
Your email address will only be used by the DSF to contact you related to the election and process and will not be shared publicly.
We had a mistake in the process and neglected to announce this phase properly so we have extended the process by a week to make things entirely fair and in the spirit of DEP-10.
Registration for Candidates will end on September 11th, 2020 AoE.
Please register using this form.
If you have questions about the election please contact foundation@djangoproject.com.
September 04, 2020 10:16 PM UTC
Luke Plant
Test smarter, not harder
“Smarter, not harder” is a saying used in many contexts, but rowing is the context I think I first heard it in, and I still associate it with rowing many years later.
When you look at novice and more experienced rowing crews, it seems particularly appropriate, because the primary difference is not the amount of effort that goes in, nor even the strength of the rowers, but technique. Poor rowers still finish a race absolutely exhausted, but they’ve moved at a fraction of the speed of better crews. Sometimes the effort they put in actually slows the boat down. They tend to make a lot of noise, splash a huge amount of water in every direction, and pull a lot of faces. (I did a lot of all those things when I tried rowing!).
Expert crews, however, do none of these things, because they don’t make you go faster. These rowers do a huge amount of training, and exercise massive amounts of concentration, to ensure that every bit of the (very large) effort they put in is actually contributing to speed.
The “smarter not harder” mindset is also essential for writing good automated software tests.
It’s in this context that religious devotion to things like TDD can be really unhelpful. For many religions, the more painful an activity, and the more you do it, the more meritorious it is — and it may even atone for past misdeeds. If you take that mindset with you into writing tests, you will do a rather bad job.
If writing tests is extremely painful, it may be a sign that something is wrong. Huge and unnecessary quantities of tests are not meritorious, they are a massive maintenance burden. Many of the things that make tests hard to write are also going to make them hard (and therefore expensive) to maintain. I’ve seen far too many examples where it looks like people have just sat back and accepted their painful fate.
For example, good ol’ Uncle Bob seems to have this attitude. He wrote:
you’d better get used to writing lots and lots of tests, no matter what language you are using!
Don’t listen to Uncle Bob! (at least, not on this subject).
“Test smarter, not harder” means:
Only write necessary tests — specifically, tests whose estimated value is greater than their estimated cost. This is a hard judgement call, of course, but it does mean that at least some of the time you should be saying “it’s not worth it”.
Write your test code with the functions/methods/classes you wish existed, not the ones you’ve been given. For example, don’t write this:
self.driver.get(self.live_server_url + reverse("contact_form"))
self.driver.find_element_by_css_selector('#id_email').send_keys('my@email.com')
self.driver.find_element_by_css_selector('#id_message').send_keys('Hello')
self.driver.find_element_by_css_selector('input[type=submit]').click()
WebDriverWait(self.driver, 10).until(lambda driver: driver.find_element_by_css_selector('body'))
That looks very tedious! Write this instead:
self.get_url("contact_form")
self.fill({'#id_email': 'my@email.com',
           '#id_message': 'Hello'})
self.submit('input[type=submit]')
(Like you can with django-functest, but it’s the principle, not the library, that’s important. If the API you want to use doesn’t exist yet, you still use it, and then make it exist.)
Don’t write tests for things that can be more effectively tested in other ways, and lean on other correctness methodologies as much as possible. These include:
- code review
- static type checking (especially in languages with sound and powerful type systems, with type inference everywhere, giving you a very good cost-benefit ratio)
- linters like flake8
- formal methods
- introspection (like Django’s checks framework)
- property based testing like hypothesis.
Move the burden onto the computer. “Push the loop in”.
Take, for example, a requirement that every entry point to your web app (i.e. a page or HTTP API), apart from a few exceptions like login and reset password, should require authentication.
The “test harder” religion interprets this as:
- For every entry point
- Write a test that
- Ensures non-authenticated requests return 403
- Write a test that
That’s a lot of tests, and even worse is that you have to remember to write them.
“Test smarter” says:
- Write a test that
- For every entry point
- Ensures non-authenticated requests return 403
- For every entry point
That’s one test. “Write a test” is executed in developer time, so in the first example the loop (“For every entry point”) is also executed in developer time. Push the loop inside the test, and it gets executed in computer time instead.
Already mentioned, but hypothesis is a great way to push the loop in. Also, the implementation of the requirements can benefit from the same techniques that the tests do.
- For every entry point
Cheat on your homework. It’s smart to get help, and hard work is for suckers. If you have a good idea, but don’t know the techniques or tools you need to implement it, or whether it is even possible (for example, in the example above you don’t know how to introspect your system to get a list of all entry points), there are a lot of smart people on StackOverflow who will revel in the challenge.
(Level up: loudly claim on Twitter that “it appears to be impossible to X with tool Y” and mansplainers like me will magically appear with solutions).
Of course, there are still times when hard work is required for writing tests — times when it will be tedious, and times when our instincts to skimp are actually misplaced laziness that will cost more in the long run. But you should hustle and cheat your way out of unnecessary effort as much as you possibly can. You should feel like “I fooled that computer into doing so much work for me!”, not ”My RSI and bleeding fingers have hopefully appeased the testing gods and atoned for my previous omissions”.
September 04, 2020 07:46 PM UTC
Mike Driscoll
Python 101 – Learning About Loops (Video)
In this tutorial, you will learn how to use for and while loops in Python.
Specifically, you’ll learn how to:
- Create a
forloop - Loop over a string
- Loop over a dictionary
- Extract multiple values from a tuple
- Use
enumeratewith loops - Create a
whileloop - Breakout of a loop
- Use
continue - Use
elsewith loops - Nest loops
Buy the book: Python 101 2nd Edition
The post Python 101 – Learning About Loops (Video) appeared first on The Mouse Vs. The Python.
September 04, 2020 01:42 PM UTC
Real Python
The Real Python Podcast – Episode #25: Data Version Control in Python and Real Python Video Transcripts
Wouldn't it be nice to a use a form of version control for data? Something that would allow you to track and version your datasets and models. Well, that's what the tool called DVC is designed to do. This week on the show, David Amos is here and he's brought another batch of PyCoder’s Weekly articles and projects.
[ Improve Your Python With 🐍 Python Tricks 💌 – Get a short & sweet Python Trick delivered to your inbox every couple of days. >> Click here to learn more and see examples ]
September 04, 2020 12:00 PM UTC
September 03, 2020
PSF GSoC students blogs
Week 14 blog!
Hi everyone
This is the last blog for GSoC 2020. It was an amazing journey and an experience to cherish for lifetime.
I would like to thank Google for giving us, students this platform and Python Software Foundation for leading so many sub-organisations and the students towards the world of open source.
The mentors I got were amazing, probably I could not have asked for better mentors.
My work can be found here: https://github.com/panda3d/panda3d/pull/950
Thank you
Everyone, stay safe and happy :)