This document shows you how to create an
[external Application Load Balancer](https://docs.cloud.google.com/load-balancing/docs/https.md.txt)
to route requests for static content to
[Cloud Storage buckets](https://docs.cloud.google.com/storage/docs/buckets.md.txt). After you
configure a load balancer with the backend buckets, requests to URL paths that
begin with `/love-to-fetch` are sent to the `us-east1`
Cloud Storage bucket, and all other requests are sent to the
`europe-north1` Cloud Storage bucket, regardless of the user's region.
If your backends serve *dynamic* content over HTTP(S), consider using
[backend services](https://docs.cloud.google.com/load-balancing/docs/https/ext-https-lb-simple.md.txt) instead of
backend buckets.
If you are an existing user of the classic Application Load Balancer, make sure that you review [Migration
overview](https://docs.cloud.google.com/load-balancing/docs/https/migrate-to-global) when you plan a new deployment with the global external Application Load Balancer.
## Cloud Storage buckets as load balancer backends
An external Application Load Balancer uses a URL map to direct traffic from specified URL paths to
your backends.
In the following diagram, the load balancer sends traffic with a path of
`/love-to-fetch/` to a Cloud Storage bucket in the `us-east1`
region. All other requests go to a Cloud Storage bucket in the
`europe-north1` region.
[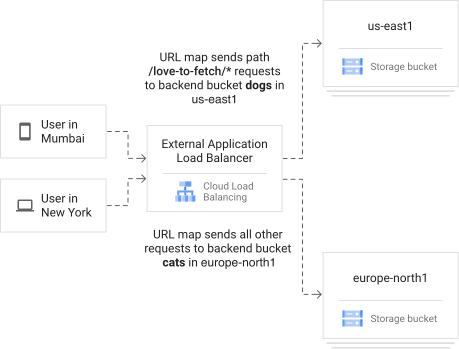](https://docs.cloud.google.com/static/load-balancing/images/lb-gcs-wo-cdn-paths.svg) Distributing traffic to Cloud Storage
By default, Cloud Storage [uses the same cache](https://docs.cloud.google.com/storage/docs/caching.md.txt)
that Cloud CDN uses. If you enable Cloud CDN on the backend
bucket, you can use Cloud CDN controls on your content.
Cloud CDN controls include, for example, cache modes, signed URLs, and
invalidation. Cloud CDN also lets you cache large content (\> 10 MB). If
you don't enable Cloud CDN on your backend bucket, you can only use
origin `Cache-Control` headers to control caching for smaller content, as set
by the Cloud Storage metadata.
## Before you begin
Make sure that your setup meets the following prerequisites. If you are using
the `gcloud storage` utility, you can install it by using instructions in
[Discover object storage with the Google Cloud CLI tool](https://docs.cloud.google.com/storage/docs/discover-object-storage-gcloud.md.txt).
### Set a default project
### Console
### gcloud
```
gcloud config set project PROJECT_ID
```
Replace `PROJECT_ID` with the project that you are using for this guide.
### Terraform
```
export GOOGLE_CLOUD_PROJECT=PROJECT_ID
```
### Permissions
To follow this guide, you need to create Cloud Storage buckets and a
load balancer in a project. You should be either a project
[owner or editor](https://docs.cloud.google.com/iam/docs/roles-overview.md.txt#basic), or you should have the
following [Compute Engine IAM roles](https://docs.cloud.google.com/compute/docs/access/iam.md.txt):
| Task | Required Role |
|---|---|
| Create load balancer components | [Network Admin](https://docs.cloud.google.com/compute/docs/access/iam.md.txt#compute.networkAdmin) |
| Create Cloud Storage buckets | [Storage Object Admin](https://docs.cloud.google.com/storage/docs/access-control/iam-roles.md.txt) |
For more information, see the following guides:
- [Access control](https://docs.cloud.google.com/load-balancing/docs/access-control.md.txt)
- [IAM
Conditions](https://docs.cloud.google.com/load-balancing/docs/access-control/iam-conditions)
### Set up an SSL certificate resource
> [!NOTE]
> **Note:** You only need an SSL certificate resource if you want to create an HTTPS load balancer. If you are creating an HTTP load balancer, you can skip this section.
To create the load balancer, you must have an [SSL certificate resource](https://docs.cloud.google.com/load-balancing/docs/ssl-certificates.md.txt) that can be attached to the target
proxy. The SSL certificate resource can be either a certificate map or a
Compute Engine SSL certificate (classic certificate).
#### Certificate map
You can create a certificate map as described in
one of the following documents:
- [Deploy a global Google-managed certificate with load balancer authorization](https://docs.cloud.google.com/certificate-manager/docs/deploy-google-managed-lb-auth.md.txt)
- [Deploy a global Google-managed certificate with DNS authorization](https://docs.cloud.google.com/certificate-manager/docs/deploy-google-managed-dns-auth.md.txt)
- [Deploy a global Google-managed certificate with Certificate Authority Service](https://docs.cloud.google.com/certificate-manager/docs/deploy-google-managed-cas.md.txt)
- [Deploy a global self-managed certificate](https://docs.cloud.google.com/certificate-manager/docs/deploy-self-managed.md.txt)
#### Compute Engine SSL certificate
For an HTTPS load balancer, create a Compute Engine SSL certificate resource
as described in one of the following documents:
- [Use self-managed SSL
certificates](https://docs.cloud.google.com/load-balancing/docs/ssl-certificates/self-managed-certs)
- [Use Google-managed SSL
certificates](https://docs.cloud.google.com/load-balancing/docs/ssl-certificates/google-managed-certs)
We recommend using a Google-managed certificate.
> [!WARNING]
> **Warning:** Don't use a self-signed certificate for production purposes.
## Reserve an external IP address
Before you create your load balancer, you can reserve a
global static external IP address that your audience uses to reach your load
balancer.
This step is optional but recommended, as a static external IP address provides
a single address to point your domain at.
> [!NOTE]
> **Note:** You can skip this step and have Google Cloud associate an ephemeral IP address with your load balancer's forwarding rule. An ephemeral IP address remains constant while the forwarding rule exists. If you need to delete the forwarding rule and re-add it, the forwarding rule might receive a new IP address. If needed, you can [make an ephemeral IP address static](https://docs.cloud.google.com/vpc/docs/reserve-static-external-ip-address.md.txt#promote_ephemeral_ip).
### Console
1. In the Google Cloud console, go to the **External IP addresses** page.
[Go to External IP addresses](https://console.cloud.google.com/addresses/list)
2. Click **Reserve static address**.
3. In the **Name** box, enter `example-ip`.
4. Set the **Network Service Tier** to **Premium**.
5. Set the **IP version** to **IPv4**.
6. Set the **Type** to **Global**.
7. Click **Reserve**.
### gcloud
```
gcloud compute addresses create example-ip \
--network-tier=PREMIUM \
--ip-version=IPV4 \
--global
```
Note the IPv4 address that was reserved:
```
gcloud compute addresses describe example-ip \
--format="get(address)" \
--global
```
### Terraform
To reserve an external IP address, use the
[`google_compute_global_address` resource](https://registry.terraform.io/providers/hashicorp/google/latest/docs/resources/compute_global_address).
```terraform
# Reserve IP address
resource "google_compute_global_address" "default" {
name = "example-ip"
}
```
### Optional: Use BYOIP addresses
With bring your own IP (BYOIP), you can import your own public addresses to
Google Cloud to use the addresses with Google Cloud resources. For
example, if you import your own IPv4 addresses, you can assign one to the
forwarding rule when you configure your load balancer. When you follow the
instructions in this document to
[create the load balancer](https://docs.cloud.google.com/load-balancing/docs/https/setup-global-ext-https-buckets.md.txt#create_an_with_backend_buckets), provide the BYOIP address as the
**IP address**.
For more information about using BYOIP, see
[Bring your own IP addresses](https://docs.cloud.google.com/vpc/docs/bring-your-own-ip.md.txt).
## Prepare your Cloud Storage buckets and content
The process for preparing your Cloud Storage buckets is as follows:
- Create the buckets.
- Copy content to the buckets.
- Provide access to the buckets.
### Create Cloud Storage buckets
In this example, you create two Cloud Storage buckets for the load
balancer to access. For production deployments, we recommend that you choose a
[multi-region bucket](https://docs.cloud.google.com/storage/docs/locations.md.txt#location-mr), which automatically
replicates objects across multiple Google Cloud regions. This can improve
the availability of your content and improve failure tolerance across your
application.
Note the names of the Cloud Storage buckets
you create, as they're used later. In this guide, they're referred to as
BUCKET_1_NAME and BUCKET_2_NAME.
### Console
1. In the Google Cloud console, go to the **Cloud Storage
Buckets** page.
[Go to Cloud Storage Buckets](https://console.cloud.google.com/storage/browser)
2. Click **Create bucket**.
3. In the **Name your bucket** box, enter a globally unique name that follows
the [naming guidelines](https://docs.cloud.google.com/storage/docs/buckets.md.txt#naming).
4. Click **Choose where to store your data**.
5. Set **Location type** to **Region**.
6. Set **Location** to **europe-north1** . This is BUCKET_1_NAME in this
guide.
7. Click **Create**.
8. Click **Buckets** to return to the Cloud Storage Buckets page.
Use these instructions to create a second bucket, but set the
**Location** to **us-east1** . This is BUCKET_2_NAME in
this guide.
### gcloud
```
gcloud storage buckets create gs://BUCKET_1_NAME --project=PROJECT_ID --default-storage-class=standard --location=europe-north1 --uniform-bucket-level-access
```
```
gcloud storage buckets create gs://BUCKET_2_NAME --project=PROJECT_ID --default-storage-class=standard --location=us-east1 --uniform-bucket-level-access
```
Replace `BUCKET_1_NAME` and `BUCKET_2_NAME`
with the names of the buckets that you want to create.
### Terraform
To create the buckets, use the [`google_storage_bucket` resource](https://registry.terraform.io/providers/hashicorp/google/latest/docs/resources/storage_bucket).
```terraform
# Create Cloud Storage buckets
resource "random_id" "bucket_prefix" {
byte_length = 8
}
resource "google_storage_bucket" "bucket_1" {
name = "${random_id.bucket_prefix.hex}-bucket-1"
location = "us-east1"
uniform_bucket_level_access = true
storage_class = "STANDARD"
// delete bucket and contents on destroy.
force_destroy = true
}
resource "google_storage_bucket" "bucket_2" {
name = "${random_id.bucket_prefix.hex}-bucket-2"
location = "us-east1"
uniform_bucket_level_access = true
storage_class = "STANDARD"
// delete bucket and contents on destroy.
force_destroy = true
}
```
To learn how to apply or remove a Terraform configuration, see
[Basic Terraform commands](https://docs.cloud.google.com/docs/terraform/basic-commands.md.txt).
### Transfer content to your Cloud Storage buckets
So you can test the setup later, copy the following images from a public
Cloud Storage bucket to your own Cloud Storage buckets.
### gcloud
1. Click
**Activate Cloud Shell**.
2. Run the following commands in Cloud Shell, replacing the bucket name
variables with your Cloud Storage bucket names:
```
gcloud storage cp gs://gcp-external-http-lb-with-bucket/three-cats.jpg gs://BUCKET_1_NAME/never-fetch/
```
```
gcloud storage cp gs://gcp-external-http-lb-with-bucket/two-dogs.jpg gs://BUCKET_2_NAME/love-to-fetch/
```
### Terraform
To copy items into the bucket, you can use the [`google_storage_bucket_object` resource](https://registry.terraform.io/providers/hashicorp/google/latest/docs/resources/storage_bucket_object).
```terraform
resource "google_storage_bucket_object" "cat_image" {
name = "never-fetch/three-cats.jpg"
source = "images/three-cats.jpg"
content_type = "image/jpeg"
bucket = google_storage_bucket.bucket_1.name
}
resource "google_storage_bucket_object" "dog_image" {
name = "love-to-fetch/two-dogs.jpg"
source = "images/two-dogs.jpg"
content_type = "image/jpeg"
bucket = google_storage_bucket.bucket_2.name
}
```
Alternatively, use the [`null_resource` resource](https://registry.terraform.io/providers/hashicorp/null/latest/docs/resources/resource).
```
resource "null_resource" "upload_cat_image" {
provisioner "local-exec" {
command = "gcloud storage cp gs://gcp-external-http-lb-with-bucket/three-cats.jpg gs://${google_storage_bucket.bucket_1.name}/never-fetch/"
}
}
resource "null_resource" "upload_dog_image" {
provisioner "local-exec" {
command = "gcloud storage cp gs://gcp-external-http-lb-with-bucket/two-dogs.jpg gs://${google_storage_bucket.bucket_2.name}/love-to-fetch/"
}
}
```
In the Google Cloud console, click **Refresh** on each bucket's details
page to verify that the file has copied successfully.
## Create an external Application Load Balancer with backend buckets
These instructions cover creating either an HTTP or HTTPS load balancer. To
create an HTTPS load balancer you must add an SSL certificate resource to the
load balancer's frontend. For more information, see the
[SSL certificates overview](https://docs.cloud.google.com/load-balancing/docs/ssl-certificates.md.txt).
### Console
#### Select the load balancer type
1. In the Google Cloud console, go to the **Load balancing** page.
[Go to Load balancing](https://console.cloud.google.com/net-services/loadbalancing/list)
2. Click **Create load balancer**.
3. For **Type of load balancer** , select **Application Load Balancer
(HTTP/HTTPS)** and click **Next**.
4. For **Public facing or internal** , select **Public facing
(external)** and click **Next**.
5. For **Global or single region deployment** , select **Best for global
workloads** and click **Next**.
6. For **Load balancer generation** , select **Global external
Application Load Balancer** and click **Next**.
7. Click **Configure**.
#### Basic configuration
1. In the **Name** box, enter `http-lb`.
#### Configure the backend
1. Click **Backend configuration**.
2. Click the **Backend services and backend buckets** box, and then click
**Create a backend bucket**.
3. In the **Backend bucket name** box, enter `cats`.
4. In the **Cloud Storage bucket** box, click **Browse**.
5. Select BUCKET_1_NAME, and then click **Select** . Creating the
`cats` backend bucket first makes it the default, where all unmatched
traffic requests are directed. You can't change a default backend bucket's
redirect rules in the load balancer.
6. Click **Create**.
7. Use the same process to create a backend bucket named `dogs`, and select
BUCKET_2_NAME.
8. Click **OK**.
#### Configure routing rules
Routing rules determine how your traffic is directed. To configure routing,
you'll set up host rules and path matchers, which are configuration components
of an
external Application Load Balancer's [URL map](https://docs.cloud.google.com/load-balancing/docs/url-map-concepts.md.txt). To set up
the rules for this example:
1. Click **Routing rules**.
2. For `dogs`, enter `*` in the **Hosts** field, and `/love-to-fetch/*` in the **Paths** field.
#### Configure the frontend
1. Click **Frontend configuration**.
2. Verify that the following options are configured with these values:
| Property | Value (type a value or select an option as specified) |
|---|---|
| **Protocol** | **HTTP** |
| **Network Service Tier** | **Premium** |
| **IP version** | **IPv4** |
| **IP address** | `example-ip` |
| **Port** | `80` |
| Optional: **HTTP keepalive timeout** | Enter a timeout value from 5 to 1200 seconds. The default value is 610 seconds. |
If you want to create an HTTPS load balancer instead of an HTTP load
balancer, you must have an
[SSL certificate](https://docs.cloud.google.com/load-balancing/docs/https/setup-global-ext-https-buckets.md.txt#ssl-cert). You must fill in the fields as follows:
| Property | Value (type a value or select an option as specified) |
|---|---|
| **Protocol** | **HTTP(S)** |
| **Network Service Tier** | **Premium** |
| **IP version** | **IPv4** |
| **IP address** | `example-ip` |
| **Port** | `443` |
| Optional: **HTTP keepalive timeout** | Enter a timeout value from 5 to 1200 seconds. The default value is 610 seconds. |
| Certificate | For **Choose certificate repository** , select **Use certificate map** or **Use classic certificates**. Depending on your selection, select a certificate map or a classic certificate. |
| Optional: Enable HTTP to HTTPS Redirect | Use this checkbox to enable redirects. Enabling this checkbox creates an additional partial HTTP load balancer that uses the same IP address as your HTTPS load balancer and redirects HTTP requests to your load balancer's HTTPS frontend. This checkbox can only be selected when the HTTPS protocol is selected and a reserved IP address is used. |
3. Click **Done**.
#### Review the configuration
1. Click **Review and finalize**.
2. Review the **Frontend** , **Host and path rules** , and **Backend buckets**.
3. Click **Create** and wait for the load balancer to be created.
4. Click the name of the load balancer (**http-lb**).
5. Note the IP address of the load balancer for the next task. In this guide,
it's referred to as IP_ADDRESS.
### gcloud
### Configure the backend
```
gcloud compute backend-buckets create cats \
--gcs-bucket-name=BUCKET_1_NAME
```
```
gcloud compute backend-buckets create dogs \
--gcs-bucket-name=BUCKET_2_NAME
```
### Configure the URL map
```
gcloud compute url-maps create http-lb \
--default-backend-bucket=cats
```
```
gcloud compute url-maps add-path-matcher http-lb \
--path-matcher-name=path-matcher-2 \
--new-hosts=* \
--backend-bucket-path-rules="/love-to-fetch/*=dogs" \
--default-backend-bucket=cats
```
### Configure the target proxy
**For an HTTP load balancer**, create a target HTTP proxy to route requests
to your URL map:
```
gcloud compute target-http-proxies create http-lb-proxy \
--http-keep-alive-timeout-sec=HTTP_KEEP_ALIVE_TIMEOUT_SEC \
--url-map=http-lb
```
Replace `HTTP_KEEP_ALIVE_TIMEOUT_SEC` with the
[client HTTP keepalive timeout](https://docs.cloud.google.com/load-balancing/docs/https.md.txt#http-keepalive-timeout)
value from 5 to 1200 seconds. The default value is 610 seconds. This field is
optional.
**For an HTTPS load balancer** , create a target HTTPS proxy to route requests
to your URL map. The target proxy holds the
[SSL certificate resource](https://docs.cloud.google.com/load-balancing/docs/https/setup-global-ext-https-buckets.md.txt#ssl-cert) for your HTTPS load balancer, so you
attach your certificate or certificate map in this step:
```
gcloud compute target-https-proxies create https-lb-proxy \
--http-keep-alive-timeout-sec=HTTP_KEEP_ALIVE_TIMEOUT_SEC \
--url-map=http-lb \
--ssl-certificates=SSL_CERTIFICATE_NAME
```
Replace the following:
- `HTTP_KEEP_ALIVE_TIMEOUT_SEC`: the [client HTTP keepalive timeout](https://docs.cloud.google.com/load-balancing/docs/https.md.txt#http-keepalive-timeout) value from 5 to 1200 seconds. The default value is 610 seconds. This field is optional.
- `SSL_CERTIFICATE_NAME`: the name of your Compute Engine SSL certificate. If you created a Certificate Manager certificate map instead, replace `--ssl-certificates=SSL_CERTIFICATE_NAME` with `--certificate-map=CERTIFICATE_MAP_NAME`.
### Configure the forwarding rule
**For an HTTP load balancer** , create a global forwarding rule to route
incoming HTTP requests on port `80` to your target HTTP proxy:
```
gcloud compute forwarding-rules create http-lb-forwarding-rule \
--load-balancing-scheme=EXTERNAL_MANAGED \
--network-tier=PREMIUM \
--address=example-ip \
--global \
--target-http-proxy=http-lb-proxy \
--ports=80
```
**For an HTTPS load balancer** , create a global forwarding rule to route
incoming HTTPS requests on port `443` to your target HTTPS proxy:
```
gcloud compute forwarding-rules create https-lb-forwarding-rule \
--load-balancing-scheme=EXTERNAL_MANAGED \
--network-tier=PREMIUM \
--address=example-ip \
--global \
--target-https-proxy=https-lb-proxy \
--ports=443
```
### Terraform
To create the load balancer, use the following Terraform resources.
### Configure the backend
To create the backend, use the [`google_compute_backend_bucket` resource](https://registry.terraform.io/providers/hashicorp/google/latest/docs/resources/compute_backend_bucket).
```terraform
# Create LB backend buckets
resource "google_compute_backend_bucket" "bucket_1" {
name = "cats"
description = "Contains cat image"
bucket_name = google_storage_bucket.bucket_1.name
}
resource "google_compute_backend_bucket" "bucket_2" {
name = "dogs"
description = "Contains dog image"
bucket_name = google_storage_bucket.bucket_2.name
}
```
### Configure the URL map
To create the URL map, use the [`google_compute_url_map` resource](https://registry.terraform.io/providers/hashicorp/google/latest/docs/resources/compute_url_map).
```terraform
# Create url map
resource "google_compute_url_map" "default" {
name = "http-lb"
default_service = google_compute_backend_bucket.bucket_1.id
host_rule {
hosts = ["*"]
path_matcher = "path-matcher-2"
}
path_matcher {
name = "path-matcher-2"
default_service = google_compute_backend_bucket.bucket_1.id
path_rule {
paths = ["/love-to-fetch/*"]
service = google_compute_backend_bucket.bucket_2.id
}
}
}
```
### Configure the target proxy
To create the target HTTP proxy, use the [`google_compute_target_http_proxy` resource](https://registry.terraform.io/providers/hashicorp/google/latest/docs/resources/compute_target_http_proxy).
```terraform
# Create HTTP target proxy
resource "google_compute_target_http_proxy" "default" {
name = "http-lb-proxy"
url_map = google_compute_url_map.default.id
}
```
### Configure the forwarding rule
To create the forwarding rule, use the [`google_compute_global_forwarding_rule` resource](https://registry.terraform.io/providers/hashicorp/google/latest/docs/resources/compute_global_forwarding_rule).
```terraform
# Create forwarding rule
resource "google_compute_global_forwarding_rule" "default" {
name = "http-lb-forwarding-rule"
ip_protocol = "TCP"
load_balancing_scheme = "EXTERNAL_MANAGED"
port_range = "80"
target = google_compute_target_http_proxy.default.id
ip_address = google_compute_global_address.default.id
}
```
NOTE: To change the [mode](https://docs.cloud.google.com/load-balancing/docs/https.md.txt#load-balancer-mode) to classic Application Load Balancer, set the `load_balancing_scheme` attribute to
`"EXTERNAL"` instead of `"EXTERNAL_MANAGED"`.
To learn how to apply or remove a Terraform configuration, see
[Basic Terraform commands](https://docs.cloud.google.com/docs/terraform/basic-commands.md.txt).
## Make your Cloud Storage buckets accessible
You can make your Cloud Storage buckets publicly readable or restrict
access to it.
### Make your Cloud Storage buckets publicly readable
When you make Cloud Storage buckets publicly readable, anyone on the
internet can list and view their objects, and view their metadata (excluding
ACLs). *Don't include sensitive information in your public buckets.*
To reduce the likelihood of accidental exposure of sensitive information, don't
store public objects and sensitive data in the same bucket.
### Console
To grant all users access to view objects in your buckets, repeat the
following procedure for each bucket:
1. In the Google Cloud console, go to the
**Cloud Storage Buckets** page.
[Go to Cloud Storage Buckets](https://console.cloud.google.com/storage/browser)
2. Click the bucket name, followed by the **Permissions** tab.
3. Click **Add**.
4. In the **New principals** box, enter `allUsers`.
5. In the **Select a role** box, select
**Cloud Storage \> Storage Object Viewer**.
6. Click **Save**.
7. Click **Allow public access**.
### gcloud
To grant all users access to view objects in your buckets, run the following
commands:
```
gcloud storage buckets add-iam-policy-binding gs://BUCKET_1_NAME --member=allUsers --role=roles/storage.objectViewer
```
```
gcloud storage buckets add-iam-policy-binding gs://BUCKET_2_NAME --member=allUsers --role=roles/storage.objectViewer
```
### Terraform
To grant all users access to view objects in your buckets, use the
[`google_storage_bucket_iam_member` resource](https://registry.terraform.io/providers/hashicorp/google/latest/docs/resources/storage_bucket_iam#google_storage_bucket_iam_member) and specify the `allUsers`
member.
```terraform
# Make buckets public
resource "google_storage_bucket_iam_member" "bucket_1" {
bucket = google_storage_bucket.bucket_1.name
role = "roles/storage.objectViewer"
member = "allUsers"
}
resource "google_storage_bucket_iam_member" "bucket_2" {
bucket = google_storage_bucket.bucket_2.name
role = "roles/storage.objectViewer"
member = "allUsers"
}
```
### Make your Cloud Storage buckets private
To enable access to your private buckets, grant the required IAM
role to the service account `service-PROJECT_NUM@https-lb.iam.gserviceaccount.com`.
This service account is created automatically upon the creation of a backend
bucket.
### Console
To grant only the service account access to view objects in your buckets,
repeat the following procedure for each bucket:
1. In the Google Cloud console, go to the **Buckets** page.
[Go to Buckets](https://console.cloud.google.com/storage/browser)
2. Navigate to the bucket that you want to enable access to and
click the **Permissions** tab.
3. In the **Permissions** section, on the **View by principals** tab, click
**Grant Access**.
4. In the **Add principals** section, in the **New principals** field,
enter the email address of the calling service account:
`service-PROJECT_NUM@https-lb.iam.gserviceaccount.com`.
> [!IMPORTANT]
> **Important:** This service account is only available for `PROJECT_NUM` after you have created at least one backend bucket resource in the project. Because you created the load balancer and backend bucket in [Create an external Application Load Balancer with backend
> buckets](https://docs.cloud.google.com/load-balancing/docs/https/ext-load-balancer-backend-buckets#create_an_with_backend_buckets), the service account is already provisioned in your project and ready to be assigned roles.
5. In the **Assign roles** section, in the **Select a role** field, select
**Cloud Storage \> Storage Object Viewer**. This
role provides read-only access.
> [!CAUTION]
> **Caution:** Private bucket access is designed for read-only content delivery. It doesn't support methods that modify or delete data, such as `POST`, `PUT`, `PATCH`, or `DELETE`.
> [!IMPORTANT]
> **Important:** When setting permissions for private bucket access, select the Storage Object Viewer role (`roles/storage.objectViewer`) only.
6. Click **Save**.
Additionally, so that all content served from the bucket is cached,
[set the cache mode](https://docs.cloud.google.com/cdn/docs/using-cache-modes.md.txt#cache-mode) to
**Force cache all content** and
[specify a maximum TTL value](https://docs.cloud.google.com/cdn/docs/using-ttl-overrides.md.txt#default-ttl).
### gcloud
To grant only the service account access to view objects in your buckets,
run the following command:
```
gcloud storage buckets add-iam-policy-binding gs://BUCKET_1_NAME \
--member=serviceAccount:service-PROJECT_NUM@https-lb.iam.gserviceaccount.com \
--role=roles/storage.objectViewer
```
```
gcloud storage buckets add-iam-policy-binding gs://BUCKET_2_NAME \
--member=serviceAccount:service-PROJECT_NUM@https-lb.iam.gserviceaccount.com \
--role=roles/storage.objectViewer
```
Replace the following:
- `BUCKET_1_NAME` and `BUCKET_2_NAME`: the name of the Cloud Storage buckets to use
- `PROJECT_NUM`: the number of your Google Cloud project
> [!CAUTION]
> **Caution:** Private bucket access is designed for read-only content delivery. It doesn't support methods that modify or delete data, such as `POST`, `PUT`, `PATCH`, or `DELETE`.
> [!IMPORTANT]
> **Important:** When setting permissions for private bucket access, you must only select the Storage Object Viewer role (`roles/storage.objectViewer`).
Additionally, so that all content served from the bucket is cached,
[set the cache mode](https://docs.cloud.google.com/cdn/docs/using-cache-modes.md.txt#cache-mode) to
**Force cache all content** and [specify a maximum TTL value](https://docs.cloud.google.com/cdn/docs/using-ttl-overrides.md.txt#default-ttl).
## Send traffic to your load balancer
Several minutes after you have configured your load balancer, you can start
sending traffic to the load balancer's IP address.
### Console
The Google Cloud console isn't supported.
### gcloud
Use the `curl` command to test the response from the following URLs. For an
HTTP load balancer, replace `IP_ADDRESS` with the
[load balancer's IPv4 address](https://docs.cloud.google.com/load-balancing/docs/https/setup-global-ext-https-buckets.md.txt#ip-address). For an HTTPS load balancer,
replace `http://IP_ADDRESS` with
`https://DOMAIN`, where `DOMAIN`
is the domain name associated with your SSL certificate that resolves to your
load balancer's IP address:
```
curl http://IP_ADDRESS/love-to-fetch/two-dogs.jpg
```
```
curl http://IP_ADDRESS/never-fetch/three-cats.jpg
```
## Additional configuration
This section expands on the configuration example to provide alternative and
additional configuration options. All of the tasks are optional. You can perform
them in any order.
### Update client HTTP keepalive timeout
The load balancer created in the previous steps has been configured with a default value for the [client HTTP keepalive
timeout](https://docs.cloud.google.com/load-balancing/docs/https#http-keepalive-timeout).
To update the client HTTP keepalive timeout, use the following instructions.
### Console
1. In the Google Cloud console, go to the **Load balancing** page.
[Go to Load balancing](https://console.cloud.google.com/networking/loadbalancing/add).
2. Click the name of the load balancer that you want to modify.
3. Click **Edit**.
4. Click **Frontend configuration**.
5. Expand **Advanced features** . For **HTTP keepalive timeout**, enter a timeout value.
6. Click **Update**.
7. To review your changes, click **Review and finalize** , and then click **Update**.
### gcloud
For an HTTP load balancer, update the target HTTP proxy by using the
[`gcloud compute target-http-proxies update` command](https://docs.cloud.google.com/sdk/gcloud/reference/compute/target-http-proxies/update):
```
gcloud compute target-http-proxies update TARGET_HTTP_PROXY_NAME \
--http-keep-alive-timeout-sec=HTTP_KEEP_ALIVE_TIMEOUT_SEC \
--global
```
For an HTTPS load balancer, update the target HTTPS proxy by using the
[`gcloud compute target-https-proxies update` command](https://docs.cloud.google.com/sdk/gcloud/reference/compute/target-https-proxies/update):
```
gcloud compute target-https-proxies update TARGET_HTTPS_PROXY_NAME \
--http-keep-alive-timeout-sec=HTTP_KEEP_ALIVE_TIMEOUT_SEC \
--global
```
Replace the following:
- `TARGET_HTTP_PROXY_NAME`: the name of the target HTTP proxy.
- `TARGET_HTTPS_PROXY_NAME`: the name of the target HTTPS proxy.
- `HTTP_KEEP_ALIVE_TIMEOUT_SEC`: the HTTP keepalive timeout value from 5 to 600 seconds.
## Query string parameters for Cloud Storage XML API
When certain query string parameters are included in requests sent to a backend
bucket through an Application Load Balancer, the client receives an HTTP 404
response with an "Unsupported query parameter" error. This happens because the
Cloud Storage XML API doesn't support these
parameters when the request comes from an Application Load Balancer.
The following table summarizes how the [Cloud Storage XML API](https://docs.cloud.google.com/storage/docs/xml-api/reference-headers.md.txt) responds to various
query parameters when requests are routed through an Application Load Balancer.
Parameters are grouped by observed behavior to help identify which are
supported, ignored, or rejected in this context.
| Parameter type | Parameters | Observed behavior |
|---|---|---|
| Supported parameters | `generation`, `prefix`, `marker`, `max-keys` | Adding these parameters (with appropriate values) works as [described](https://docs.cloud.google.com/storage/docs/xml-api/reference-headers.md.txt#query) in the Cloud Storage XML API documentation. The API returns a standard [HTTP response](https://docs.cloud.google.com/storage/docs/xml-api/overview.md.txt#responses). |
| Ignored parameters | `acl`, `billing`, `compose`, `delimiter`, `encryption`, `encryptionConfig`, `response-content-disposition`, `response-content-type`, `tagging`, `versions`, `websiteConfig` | Adding these parameters has no effect. If the load balancer passes these parameters to Cloud Storage, the Cloud Storage XML API ignores them, and responds as though the parameters don't exist. |
| Rejected parameters | `cors`, `lifecycle`, `location`, `logging`, `storageClass`, `versioning` | The Cloud Storage XML API returns an "Unsupported query parameter" error. |
## Limitations
- Backend buckets are only supported with global external Application Load Balancers and classic Application Load Balancer. They aren't supported by the regional external Application Load Balancer or any other load balancer type.
- Backend buckets aren't supported with Identity-Aware Proxy.
- The global external Application Load Balancer doesn't support uploads to Cloud Storage buckets.
- The load balancer doesn't support the use of signed URLs unless
Cloud CDN is enabled.
> [!NOTE]
> **Note:** [Signed URLs used in Cloud Storage](https://docs.cloud.google.com/storage/docs/access-control/signed-urls.md.txt) are different from [signed URLs used with Cloud CDN](https://docs.cloud.google.com/cdn/docs/using-signed-urls.md.txt). The global external Application Load Balancer supports only Cloud CDN signed URLs. Cloud Storage signed URLs are *not* supported through the load balancer, regardless of whether Cloud CDN is enabled.
## What's next
- [Setting up multi-region load
balancing](https://docs.cloud.google.com/load-balancing/docs/https/setting-up-https)
- [Setting up Cloud CDN with a backend
bucket](https://docs.cloud.google.com/cdn/docs/setting-up-cdn-with-bucket)