This document shows you two sample configurations for setting up a
global external Application Load Balancer with VM instance group backends in a Shared VPC
environment:
- In the [first example](https://docs.cloud.google.com/load-balancing/docs/https/set-up-global-ext-https-shared-vpc.md.txt#service-project), the load balancer's frontend and backend components are created in one service project.
- In the [second example](https://docs.cloud.google.com/load-balancing/docs/https/set-up-global-ext-https-shared-vpc.md.txt#cross-project), the load balancer's frontend components and URL map are created in one service project, while the load balancer's backend service and backends are created in a different service project. This type of deployment, where the URL map in one project references a backend service in another project, is referred to as [*cross-project
service referencing*](https://docs.cloud.google.com/load-balancing/docs/https#cross-project).
Both examples require the same initial configuration to
[grant permissions](https://docs.cloud.google.com/load-balancing/docs/https/set-up-global-ext-https-shared-vpc.md.txt#shared-vpc-permissions),
[configure the network and subnet](https://docs.cloud.google.com/load-balancing/docs/https/set-up-global-ext-https-shared-vpc.md.txt#host-network) in the
host project, and [set up Shared VPC](https://docs.cloud.google.com/load-balancing/docs/https/set-up-global-ext-https-shared-vpc.md.txt#set-up-shared-vpc)
before you can start creating load balancers.
These are not the only Shared VPC configurations supported by the
global external Application Load Balancer. For other valid Shared VPC architectures, see
[Shared VPC architecture](https://docs.cloud.google.com/load-balancing/docs/https.md.txt#shared-vpc).
If you don't want to use a Shared VPC network, see
[Set up a global external Application Load Balancer with VM instance group
backends](https://docs.cloud.google.com/load-balancing/docs/https/setup-global-ext-https-compute).
## Before you begin
- Read the [Shared VPC overview](https://docs.cloud.google.com/vpc/docs/shared-vpc.md.txt).
- Read the [External Application Load Balancer overview](https://docs.cloud.google.com/load-balancing/docs/https.md.txt), including the Shared VPC architecture section.
## Permissions required
Setting up a load balancer on a Shared VPC network requires some
initial setup and provisioning by an administrator. After the initial setup, a
service project owner can do one of the following:
- Deploy all the load balancer's components and its backends in a service project.
- Deploy the load balancer's backend components (backend service and backends) in service projects that can be referenced by a URL map in another service or host project.
This section summarizes the permissions required to follow this guide
to set up a load balancer on a Shared VPC network.
### Set up Shared VPC
The following roles are required for the following tasks:
1. Perform one-off administrative tasks such as setting up the Shared VPC and enabling a host project.
2. Perform administrative tasks that must be repeated every time you want to onboard a new service project. This includes attaching the service project, provisioning and configuring networking resources, and granting access to the service project administrator.
These tasks must be performed in the Shared VPC host project. We
recommend that the Shared VPC Admin also be the owner of the
Shared VPC host project. This automatically grants the Network Admin and
Security Admin roles.
| Task | Required role |
|---|---|
| Set up Shared VPC, enable host project, and grant access to service project administrators | [Shared VPC Admin](https://docs.cloud.google.com/compute/docs/access/iam.md.txt#compute.xpnAdmin) |
| Create subnets in the Shared VPC host project and grant access to service project administrators | [Network Admin](https://docs.cloud.google.com/compute/docs/access/iam.md.txt#compute.networkAdmin) |
| Add and remove firewall rules | [Security Admin](https://docs.cloud.google.com/compute/docs/access/iam.md.txt#compute.securityAdmin) |
After the subnets have been provisioned, the host project owner must grant the
Network User role *in the host project* to anyone (typically service project
administrators, developers, or service accounts) who needs to use these
resources.
| Task | Required role |
|---|---|
| Use VPC networks and subnets belonging to the host project | [Network User](https://docs.cloud.google.com/compute/docs/access/iam.md.txt#compute.networkUser) |
This role can be granted on the project level or for individual subnets. We
recommend that you grant the role on individual subnets. Granting the role on
the project provides access to all current and future subnets in the
VPC network of the host project.
### Deploy load balancer and backends
Service project administrators need the following roles *in the service project*
to create load balancing resources and backends. These permissions are granted
automatically to the service project owner or editor.
Roles granted in the service project
| Task | Required role |
|---|---|
| Create load balancer components | [Network Admin](https://docs.cloud.google.com/compute/docs/access/iam.md.txt#compute.networkAdmin) |
| Create instances | [Instance Admin](https://docs.cloud.google.com/compute/docs/access/iam.md.txt#compute.instanceAdmin.v1) |
| Create and modify SSL certificates | [Security Admin](https://docs.cloud.google.com/compute/docs/access/iam.md.txt#compute.securityAdmin) |
### Reference cross-project backend services
If your load balancer needs to reference backend services from other service
projects, also known as [cross-project service
referencing](https://docs.cloud.google.com/load-balancing/docs/l7-internal#cross-project), load balancer
administrators will require the following role *in the service project where the
backend service is created*.
Roles granted in the service project
| Task | Required role |
|---|---|
| Permissions to use services in other projects | [Load Balancer Services User](https://docs.cloud.google.com/compute/docs/access/iam.md.txt#compute.loadBalancerServiceUser) |
This role can be granted either at the project level or for individual backend
services. For instructions about how to grant this role, see the [cross-project
service referencing example](https://docs.cloud.google.com/load-balancing/docs/https/set-up-global-ext-https-shared-vpc#grant-bs-user) on this page.
For more information about IAM, see the following guides:
- [Access control](https://docs.cloud.google.com/load-balancing/docs/access-control.md.txt)
- [IAM conditions](https://docs.cloud.google.com/load-balancing/docs/access-control/iam-conditions.md.txt)
## Prerequisites
In this section, you need to perform the following steps:
1. [Configure the network and subnets in the host project](https://docs.cloud.google.com/load-balancing/docs/https/set-up-global-ext-https-shared-vpc.md.txt#host-network).
2. [Set up Shared VPC in the host project](https://docs.cloud.google.com/load-balancing/docs/https/set-up-global-ext-https-shared-vpc.md.txt#set-up-shared-vpc).
The steps in this section do not need to be performed every time you want to
create a new load balancer. However, you must ensure that you have access to
the resources described here before you proceed to creating the load balancer.
### Configure the network and subnets in the host project
You need a Shared VPC network with a subnet for the load balancer's backends.
This example uses the following network, region, and subnet:
- **Network.** The network is named `lb-network`.
- **Subnet for load balancer's backends.** A subnet
named `lb-backend-subnet` in the
`us-west1` region uses `10.1.2.0/24` for its primary IP range.
> [!NOTE]
> **Note:** You can change the name of the network, the region, and the parameters for the subnets; however, subsequent steps in this guide use the network, region, and subnet parameters as outlined here.
#### Configure the subnet for the load balancer's backends
This step does not need to be performed every time you want to create a new load balancer. You only need to ensure that the service project has access to a subnet in the Shared VPC network.
*All the steps in this section must be performed in the host project.*
### Console
1. In the Google Cloud console, go to the **VPC networks** page.
[Go to VPC networks](https://console.cloud.google.com/networking/networks/list)
2. Click **Create VPC network**.
3. For **Name** , enter `lb-network`.
4. In the **Subnets** section:
1. Set the **Subnet creation mode** to **Custom**.
2. In the **New subnet** section, enter the following information:
- **Name** : `lb-backend-subnet`
- **Region** : `us-west1`
- **IP address range** : `10.1.2.0/24`
3. Click **Done**.
5. Click **Create**.
### gcloud
1. Create a VPC network with the [`gcloud compute
networks create` command](https://docs.cloud.google.com/sdk/gcloud/reference/compute/networks/create):
```
gcloud compute networks create lb-network --subnet-mode=custom
```
2. Create a subnet in the `lb-network` network in the `us-west1` region:
```
gcloud compute networks subnets create lb-backend-subnet
--network=lb-network
--range=10.1.2.0/24
--region=us-west1
```
#### Give service project admins access to the backend subnet
Service project administrators require access to the `lb-backend-subnet` subnet so that they can provision the load balancer's backends.
A Shared VPC Admin must grant access to the backend subnet to service
project administrators (or developers who deploy resources and backends
that use the subnet). For instructions, see
[Service Project Admins for some subnets](https://docs.cloud.google.com/vpc/docs/provisioning-shared-vpc.md.txt#networkuseratsubnet).
### Configure firewall rules in the host project
This example uses the following firewall rule:
- **`fw-allow-health-check`.** An ingress rule, applicable to the instances being load balanced, that allows all TCP traffic from the [Google Cloud
health check probe ranges](https://docs.cloud.google.com/load-balancing/docs/health-check-concepts#ip-ranges). This example uses the target tag `load-balanced-backend` to identify the instances to which it should apply.
Without this firewall rule, the [default deny
ingress](https://docs.cloud.google.com/vpc/docs/firewalls#default_firewall_rules) rule blocks incoming traffic to the backend instances.
*All the steps in this section must be performed in the host project.*
### Console
1. In the Google Cloud console, go to the **Firewall policies** page.
[Go to Firewall policies](https://console.cloud.google.com/net-security/firewall-manager/firewall-policies/list)
2. Click **Create firewall rule** to create the rule to allow Google Cloud health checks:
- **Name** : `fw-allow-health-check`
- **Network** : `lb-network`
- **Direction of traffic**: Ingress
- **Action on match**: Allow
- **Targets**: Specified target tags
- **Target tags** : `load-balanced-backend`
- **Source filter**: IPv4 ranges
- **Source IPv4 ranges** : `35.191.0.0/16`
- **Protocols and ports** :
- Choose **Specified protocols and ports**.
- Check **TCP** and enter `80` for the port number.
- As a best practice, limit this rule to just the protocols and ports that match those used by your health check. If you use `tcp:80` for the protocol and port, Google Cloud can use HTTP on port `80` to contact your VMs, but it cannot use HTTPS on port `443` to contact them.
3. Click **Create**.
### gcloud
1. Create the `fw-allow-health-check` firewall rule to allow
Google Cloud health checks. This example allows all TCP traffic
from health check probers. However, you can configure a narrower set
of ports to meet your needs.
gcloud compute firewall-rules create fw-allow-health-check \
--network=lb-network \
--action=allow \
--direction=ingress \
--source-ranges=35.191.0.0/16 \
--target-tags=load-balanced-backend \
--rules=tcp
### Set up Shared VPC in the host project
This step entails enabling a Shared VPC host project, sharing subnets of
the host project, and attaching service projects to the host project so that the
service projects can use the Shared VPC network. To set up
Shared VPC in the host project, see the following pages:
- [Enable a host project](https://docs.cloud.google.com/vpc/docs/provisioning-shared-vpc.md.txt#enable-shared-vpc-host).
- [Attach a service project](https://docs.cloud.google.com/vpc/docs/provisioning-shared-vpc.md.txt#create-shared).
> [!NOTE]
> **Note:** Managed instance groups used with Shared VPC require making the *Google APIs service account* a Service Project Admin. This is because tasks like automatic instance creation via autoscaling are performed by this type of service account. To define the *Google APIs service account* as a Service Project Admin for the subnet in the Shared VPC host project, see [Google APIs service account as a Service Project
> Admin](https://docs.cloud.google.com/vpc/docs/provisioning-shared-vpc#migs-service-accounts).
The rest of these instructions assume that you have already set up
Shared VPC. This includes [setting up IAM policies for your
organization](https://docs.cloud.google.com/load-balancing/docs/https/set-up-global-ext-https-shared-vpc#shared-vpc-permissions) and designating
the host and service projects.
Don't proceed until you have set up Shared VPC and enabled the host
and service projects.
After completing the steps defined in this prerequisites section, you can pursue
either of the following setups:
- [Configure a load balancer in one service project](https://docs.cloud.google.com/load-balancing/docs/https/set-up-global-ext-https-shared-vpc.md.txt#service-project)
- [Configure a load balancer with a cross-project backend service](https://docs.cloud.google.com/load-balancing/docs/https/set-up-global-ext-https-shared-vpc.md.txt#cross-project)
## Configure a load balancer in one service project
After you have configured the VPC network in the host project
and set up Shared VPC, you can switch your attention to the
service project, in which you need to create all the load balancing components
(backend service, URL map, target proxy, and forwarding rule) and the backends.
This section assumes that you have carried out the prerequisite steps described
in the previous section in the host project. In this section, the load
balancer's frontend and backend components along with the backends are created
in one service project.
The following figure depicts the components of a global external Application Load Balancer in one
service project, which is attached to the host project in a Shared VPC
network.
[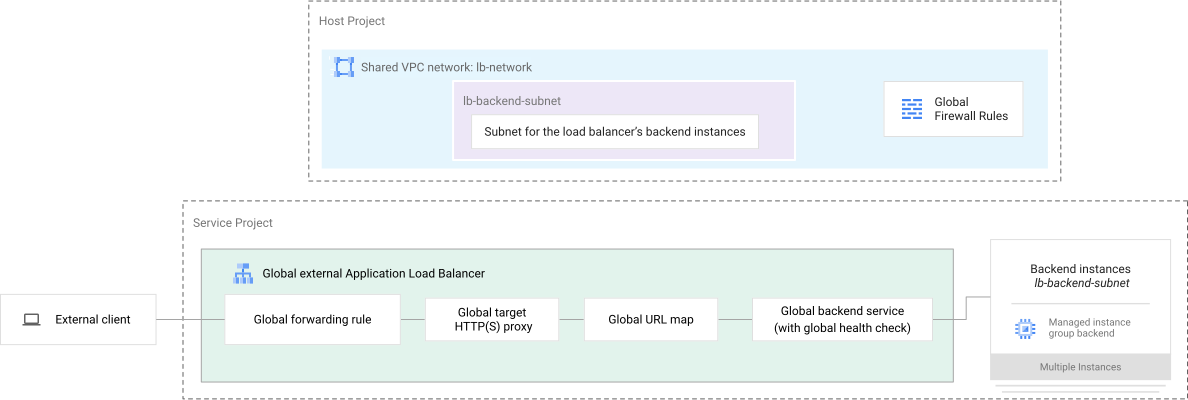](https://docs.cloud.google.com/static/load-balancing/images/global-ext-https-lb-shared-vpc-example.svg) **Figure 1.** Load balancer's frontend and backend components in one service project
These steps should be carried out by the service project administrator (or a
developer operating within the service project) and do not require involvement
from the host project administrator. The steps in this section are
similar to the [standard steps to set up a
global external Application Load Balancer](https://docs.cloud.google.com/load-balancing/docs/https/setup-global-ext-https-compute).
The example on this page explicitly sets a reserved IP address for
the global external Application Load Balancer's forwarding rule, rather than allowing an
ephemeral IP address to be allocated. As a best practice, we recommend
reserving IP addresses for forwarding rules.
### Create a managed instance group backend
> [!NOTE]
> **Note:** When using Shared VPC to create a managed instance group (MIG), you need to define the [*Google APIs service account* as a Service Project
> Admin](https://docs.cloud.google.com/vpc/docs/provisioning-shared-vpc#migs-service-accounts) for the subnet in the Shared VPC host project.
The precursor to creating a managed instance group is the creation of an
instance template, which is a resource that you can use to create virtual
machine (VM) instances. Traffic from clients is load balanced to VMs in
an instance group. The managed instance group provides VMs that run the
backend servers of an external Application Load Balancer. In this example, the backends
serve their own hostnames.
### Console
#### Create an instance template
Create an instance template to save the VM instance configuration
that is used to provision VM instances for your global external Application Load Balancer's
backend.
1. In the Google Cloud console, go to the Compute Engine
**Instance templates** page.
[Go to Instance templates](https://console.cloud.google.com/compute/instanceTemplates/list)
2. Click **Create instance template**.
3. For **Name** , enter `backend-template`.
4. In the **Boot disk** section, ensure that the boot disk is set to a Debian
image, such as **Debian GNU/Linux 12 (bookworm)** . Click **Change** to change
the image if necessary.
5. Expand the **Advanced options** section.
6. Expand the **Networking** section, and in the **Network tags** field, enter
`load-balanced-backend`.
7. For **Network interfaces** , select **Networks shared with me (from host
project: `HOST_PROJECT_ID`)**.
8. In the **Shared subnetwork** list, select the `lb-backend-subnet`
subnet from the `lb-network` network.
9. Expand the **Management** section, and in the **Automation** field, specify the
following startup script:
```console
#! /bin/bash
apt-get update
apt-get install apache2 -y
a2ensite default-ssl
a2enmod ssl
vm_hostname="$(curl -H "Metadata-Flavor:Google" \
http://metadata.google.internal/computeMetadata/v1/instance/name)"
echo "Page served from: $vm_hostname" | \
tee /var/www/html/index.html
systemctl restart apache2
```
10. Click **Create**.
#### Create a managed instance group
Create a managed instance group to provide the backend servers
that handle requests distributed by the global external Application Load Balancer's
backend service.
1. In the Google Cloud console, go to the Compute Engine
**Instance groups** page.
[Go to Instance groups](https://console.cloud.google.com/compute/instanceGroups/list)
2. Click **Create Instance Group**.
3. From the options, select **New managed instance group (stateless)**.
4. For the name of the instance group, enter `lb-backend`.
5. In the **Instance template** list, select the instance template
`backend-template` that you created in the previous step.
6. In the **Location** section, select **Single zone**, and enter the following
values:
- For **Region** , select `us-west1`.
- For **Zone** , select `us-west1-a`.
7. In the **Autoscaling** section, enter the following values:
- For **Autoscaling mode** , select **On: add and remove instances to the
group**.
- For **Minimum number of instances** , select `2`.
- For **Maximum number of instances** , select `3`.
8. In the **Port mapping** section, click **Add port**, and enter the
following values:
- For **Port name** , enter `http`.
- For **Port number** , enter `80`.
9. Click **Create**.
### gcloud
1. Create an instance template:
```
gcloud compute instance-templates create backend-template \
--region=us-west1 \
--network=projects/HOST_PROJECT_ID/global/networks/lb-network \
--subnet=projects/HOST_PROJECT_ID/regions/us-west1/subnetworks/lb-backend-subnet \
--tags=load-balanced-backend \
--image-family=debian-12 \
--image-project=debian-cloud \
--metadata=startup-script='#! /bin/bash
apt-get update
apt-get install apache2 -y
a2ensite default-ssl
a2enmod ssl
vm_hostname="$(curl -H "Metadata-Flavor:Google" \
http://metadata.google.internal/computeMetadata/v1/instance/name)"
echo "Page served from: $vm_hostname" | \
tee /var/www/html/index.html
systemctl restart apache2' \
--project=SERVICE_PROJECT_ID
```
2. Create a managed instance group and select the instance template
that you created in the preceding step:
```
gcloud compute instance-groups managed create lb-backend \
--zone=us-west1-a \
--size=2 \
--template=backend-template \
--project=SERVICE_PROJECT_ID
```
3. Add a named port to the instance group:
```
gcloud compute instance-groups set-named-ports lb-backend \
--named-ports=http:80 \
--zone=us-west1-a \
--project=SERVICE_PROJECT_ID
```
### Create a health check
Health checks are tests that confirm the availability of backends. Create a
health check that uses the HTTP protocol and probes on port `80`. Later, you'll
attach this health check to the backend service referenced by the load balancer.
### Console
1. In the Google Cloud console, go to the Compute Engine
**Health checks** page.
[Go to Health checks](https://console.cloud.google.com/compute/healthChecks)
2. For the name of the health check, enter `lb-health-check`.
3. Set the protocol to **HTTP**.
4. Click **Create**.
### gcloud
Create an HTTP health check.
```
gcloud compute health-checks create http lb-health-check \
--use-serving-port \
--project=SERVICE_PROJECT_ID
```
### Reserve the load balancer's IP address
Reserve a global static external IP address that can be assigned to the
forwarding rule of the load balancer.
### Console
1. In the Google Cloud console, go to the VPC
**IP addresses** page.
[Go to IP addresses](https://console.cloud.google.com/networking/addresses/list)
2. Click **Reserve external**.
3. On the **Reserve external static IP address** page, for **Name** , enter `lb-ipv4-1`.
4. Set **Network Service Tier** to **Premium**.
5. Set **IP version** to **IPv4**.
6. Set **Type** to **Global**.
7. Click **Reserve**.
### gcloud
Create a global static external IP address.
```
gcloud compute addresses create lb-ipv4-1 \
--ip-version=IPV4 \
--network-tier=PREMIUM \
--global
--project=SERVICE_PROJECT_ID
```
### Set up an SSL certificate resource
To create the load balancer, you must have an [SSL certificate resource](https://docs.cloud.google.com/load-balancing/docs/ssl-certificates.md.txt) that can be attached to the target
proxy. The SSL certificate resource can be either a certificate map or a
Compute Engine SSL certificate (classic certificate).
#### Certificate map
You can create a certificate map as described in
one of the following documents:
- [Deploy a global Google-managed certificate with load balancer authorization](https://docs.cloud.google.com/certificate-manager/docs/deploy-google-managed-lb-auth.md.txt)
- [Deploy a global Google-managed certificate with DNS authorization](https://docs.cloud.google.com/certificate-manager/docs/deploy-google-managed-dns-auth.md.txt)
- [Deploy a global Google-managed certificate with Certificate Authority Service](https://docs.cloud.google.com/certificate-manager/docs/deploy-google-managed-cas.md.txt)
- [Deploy a global self-managed certificate](https://docs.cloud.google.com/certificate-manager/docs/deploy-self-managed.md.txt)
#### Compute Engine SSL certificate
For an HTTPS load balancer, create a Compute Engine SSL certificate resource
as described in one of the following documents:
- [Use self-managed SSL
certificates](https://docs.cloud.google.com/load-balancing/docs/ssl-certificates/self-managed-certs)
- [Use Google-managed SSL
certificates](https://docs.cloud.google.com/load-balancing/docs/ssl-certificates/google-managed-certs)
We recommend using a Google-managed certificate.
> [!WARNING]
> **Warning:** Don't use a self-signed certificate for production purposes.
### Configure the load balancer
This section shows you how to create the following resources for a
global external Application Load Balancer:
- Backend service with a managed instance group as the backend
- URL map
- SSL certificate (required only for HTTPS traffic)
- Target proxy
- Forwarding rule
In this example, you can use HTTP or HTTPS as the request-and-response protocol
between the client and the load balancer. For HTTPS, you need an [SSL
certificate resource](https://docs.cloud.google.com/load-balancing/docs/https/set-up-global-ext-https-shared-vpc#ssl-cert) to configure the proxy. We recommend using a
Google-managed certificate.
### Console
#### Select the load balancer type
1. In the Google Cloud console, go to the **Load balancing** page.
[Go to Load balancing](https://console.cloud.google.com/net-services/loadbalancing/list)
2. Click **Create load balancer**.
3. For **Type of load balancer** , select **Application Load Balancer
(HTTP/HTTPS)** and click **Next**.
4. For **Public facing or internal** , select **Public facing
(external)** and click **Next**.
5. For **Global or single region deployment** , select **Best for global
workloads** and click **Next**.
6. For **Load balancer generation** , select **Global external
Application Load Balancer** and click **Next**.
7. Click **Configure**.
#### Basic configuration
1. For the load balancer name, enter `l7-xlb-shared-vpc`.
#### Configure the load balancer frontend
**For HTTP traffic**:
1. Click **Frontend configuration**.
2. For the name of the load balancer frontend, enter `http-fw-rule`.
3. For **Protocol** , select **HTTP**.
4. Set **IP version** to **IPv4**.
5. For **IP address** , select `lb-ipv4-1`, which is the IP address that you
reserved earlier.
6. Set the **Port** to `80` to allow HTTP traffic.
7. To complete the frontend configuration, click **Done**.
8. Verify that there is a blue check
mark next to **Frontend configuration** before continuing.
**For HTTPS traffic**:
1. Click **Frontend configuration**.
2. For the name of the load balancer frontend, enter `https-fw-rule`.
3. For **Protocol** , select **HTTPS**.
4. Set **IP version** to **IPv4**.
5. For **IP address** , select `lb-ipv4-1`, which is the IP address that you
reserved earlier.
6. Set the **Port** to `443` to allow HTTPS traffic.
7. For **Choose certificate repository** , select
**Use certificate map** or **Use classic certificates**.
8. Depending on your selection, select a certificate map or a
classic certificate.
9. To complete the frontend configuration, click **Done**.
10. Verify that there is a blue check mark next to **Frontend configuration**
before continuing.
#### Configure the backend
1. Click **Backend configuration**.
2. In the **Backend services and backend buckets** menu, click **Create a
backend service**.
3. For the name of the backend service, enter `lb-backend-service`.
4. For **Backend type** , select **Instance group**.
5. Set **Protocol** to **HTTP**.
6. In the **Named port** field, enter `http`. This is the same port name that
you entered while creating the managed instance group.
7. To add *backends* to the backend service, do the following:
1. In the **Backends** section, set the **Instance group** to
`lb-backend`, which is the managed instance group that you
created in an earlier step.
2. For **Port numbers** , enter `80`.
3. To add the backend, click **Done**.
8. To add a health check, in the **Health check** list, select
`lb-health-check`, which is the health check that you created earlier.
9. To create the backend service, click **Create**.
10. Verify that there is a blue check mark next to **Backend configuration**
before continuing.
#### Configure the routing rules
- Click **Routing rules** . Ensure that `lb-backend-service` is the default backend service for any unmatched host and any unmatched path.
For information about traffic management, see [Set up traffic management](https://docs.cloud.google.com/load-balancing/docs/https/setting-up-global-traffic-mgmt.md.txt).
#### Review and finalize the configuration
1. Click **Review and finalize**.
2. Review the frontend and backend settings of the load balancer to ensure
that it is configured as desired.
3. Click **Create**, and then wait for the load balancer to be created.
### gcloud
1. Create a backend service to distribute traffic among backends:
```
gcloud compute backend-services create lb-backend-service \
--load-balancing-scheme=EXTERNAL_MANAGED \
--protocol=HTTP \
--port-name=http \
--health-checks=lb-health-check \
--global \
--project=SERVICE_PROJECT_ID
```
2. Add your instance group as the backend to the backend service:
```
gcloud compute backend-services add-backend lb-backend-service \
--instance-group=lb-backend \
--instance-group-zone=us-west1-a \
--global \
--project=SERVICE_PROJECT_ID
```
3. Create a URL map to route incoming requests to the backend service:
```
gcloud compute url-maps create lb-map \
--default-service=lb-backend-service \
--global \
--project=SERVICE_PROJECT_ID
```
4. Create a target proxy.
**For HTTP traffic**, create a target HTTP proxy to route
requests to the URL map:
```
gcloud compute target-http-proxies create http-proxy \
--url-map=lb-map \
--global \
--project=SERVICE_PROJECT_ID
```
**For HTTPS traffic** , create a target HTTPS proxy to route
requests to the URL map. The proxy is the part of the load
balancer that holds the SSL certificate for an HTTPS load balancer,
so you also load your [SSL certificate](https://docs.cloud.google.com/load-balancing/docs/https/set-up-global-ext-https-shared-vpc.md.txt#ssl-cert) in this step:
```
gcloud compute target-https-proxies create https-proxy \
--url-map=lb-map \
--ssl-certificates=lb-ssl-cert
--global \
--project=SERVICE_PROJECT_ID
```
5. Create a forwarding rule.
**For HTTP traffic**, create a global forwarding rule to route
incoming requests to the target proxy:
```
gcloud compute forwarding-rules create http-fw-rule \
--load-balancing-scheme=EXTERNAL_MANAGED \
--address=lb-ipv4-1 \
--global \
--target-http-proxy=http-proxy \
--ports=80 \
--project=SERVICE_PROJECT_ID
```
**For HTTPS traffic**, create a global forwarding rule to route
incoming requests to the target proxy:
```
gcloud compute forwarding-rules create https-fw-rule \
--load-balancing-scheme=EXTERNAL_MANAGED \
--address=lb-ipv4-1 \
--global \
--target-https-proxy=https-proxy \
--ports=443 \
--project=SERVICE_PROJECT_ID
```
### Test the load balancer
When the load balancing service is running, you can send
traffic to the forwarding rule and watch the traffic be dispersed to different
instances.
### Console
1. In the Google Cloud console, go to the **Load balancing** page.
[Go to Load balancing](https://console.cloud.google.com/net-services/loadbalancing/list/loadBalancers)
2. Click the load balancer that you just created.
3. Note the load balancer's IP address. This IP address is referred to as
`LB_IP_ADDRESS` in the following steps.
4. In the **Backend** section, confirm that the VMs are healthy.
The **Healthy** column should be populated, indicating that the VMs are
healthy---for example, if two instances are created, then you should
see a message indicating `2 of 2` with a green check mark next to it. If
you see otherwise, first try reloading the page. It can take a few
minutes for the Google Cloud console to indicate that the VMs are
healthy. If the backends do not appear healthy after a few minutes,
review the firewall configuration and the network tag assigned to your
backend VMs.
5. After the Google Cloud console shows that the backend instances are
healthy, you can test your load balancer by pointing your web browser to
`https://LB_IP_ADDRESS` (or
`http://LB_IP_ADDRESS`). Replace
`LB_IP_ADDRESS` with the [load balancer's IP
address](https://docs.cloud.google.com/load-balancing/docs/https/set-up-global-ext-https-shared-vpc#reserve-ip).
6. If you used a self-signed certificate for testing HTTPS, your browser
displays a warning. You must explicitly instruct your browser to accept a
self-signed certificate.
7. Your browser should render a page with content showing the name of the
instance that served the page (for example, `Page served from:
lb-backend-example-xxxx`). If your browser doesn't render this page,
review the configuration settings in this guide.
### gcloud
Note the IP address that was reserved:
```
gcloud compute addresses describe IP_ADDRESS_NAME \
--format="get(address)" \
--global
```
You can test your load balancer by pointing your web browser to
`https://LB_IP_ADDRESS` (or
`http://LB_IP_ADDRESS`). Replace
`LB_IP_ADDRESS` with the [load balancer's IP
address](https://docs.cloud.google.com/load-balancing/docs/https/set-up-global-ext-https-shared-vpc#reserve-ip).
If you used a self-signed certificate for testing HTTPS, your browser
displays a warning. You must explicitly instruct your browser to accept a
self-signed certificate.
Your browser should render a page with minimal information about the backend
instance. If your browser doesn't render this page, review the configuration
settings in this guide.
## Configure a load balancer with a cross-project backend service
This section shows you how to configure a load balancer with a
[*cross-project*](https://docs.cloud.google.com/load-balancing/docs/https.md.txt#cross-project) backend service in a
Shared VPC environment.
### Before you begin
The previous example on this page shows you how to set up a Shared VPC
deployment where all the load balancer components and its backends are created
in one service project. Global external Application Load Balancers also let you configure
Shared VPC deployments where a URL map in one host or service project
references backend services (and backends) located across multiple service
projects in the Shared VPC environment.
You can use the steps in this section as a reference to configure any of
the supported combinations listed here:
- Forwarding rule, target proxy, and URL map in the host project, and backend service in a service project
- Forwarding rule, target proxy, and URL map in one service project, and backend service in another service project
While this section uses a Shared VPC environment to configure a
cross-project deployment, a Shared VPC environment isn't required. For
global external Application Load Balancers, your load balancer frontend can reference backend
services or backend buckets from any project within the same organization.
### Setup requirements
If you haven't already done so, you must complete all of the prerequisite steps
to set up Shared VPC and configure the network, subnets, and firewall
rules required for this example. For instructions, see the following sections at
the beginning of this page:
- [Permissions required to set up Shared VPC](https://docs.cloud.google.com/load-balancing/docs/https/set-up-global-ext-https-shared-vpc.md.txt#shared-vpc-permissions)
- [Prerequisite configuration in the host project](https://docs.cloud.google.com/load-balancing/docs/https/set-up-global-ext-https-shared-vpc.md.txt#prerequisites)
In this setup, the forwarding rule, target proxy, and URL
map are located in one service project, and the backend service and
backends are located in another service project.
1. **In service project B** , you'll configure the following backend resources:
- Managed instance group backend
- Health check
- Global backend service
2. **In service project A** , you'll configure the following frontend resources:
- IP address
- SSL certificate
- URL map
- Target proxy
- Forwarding rule
The following figure depicts a global external Application Load Balancer in which the load
balancer's backend service in one service project is referenced by a URL map in
another service project.
[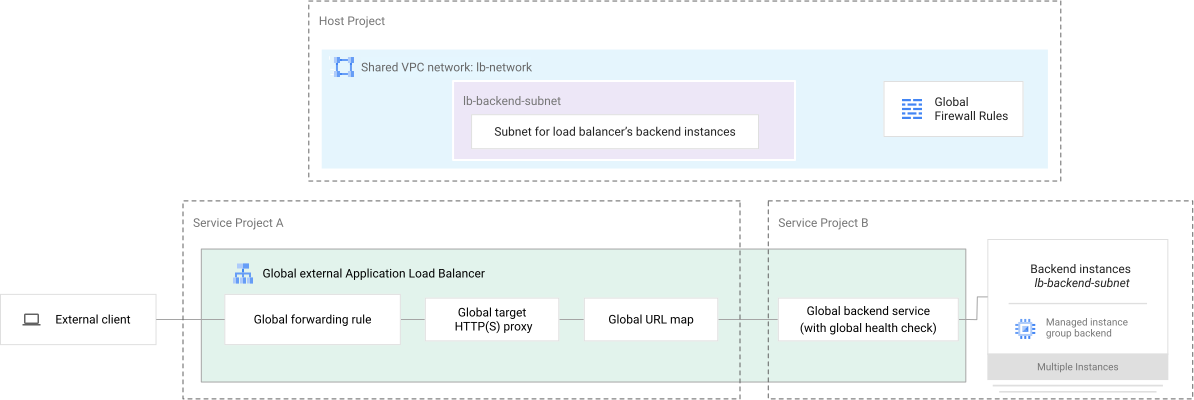](https://docs.cloud.google.com/static/load-balancing/images/global-ext-https-lb-shared-vpc-example-cross-project.svg) **Figure 2.** Load balancer's frontend and backend in different service projects
Cross-project service referencing with a global external Application Load Balancer
does not require backend instances to be a part of the same VPC
network or a Shared VPC network.
In this example, the backend VMs in the service project are a part of the
Shared VPC network that is created in the host project. However, you
can also set up a standalone VPC network (that is, an unshared
VPC network), along with the required firewall rules, in a service project.
You can then create backend instances (for example, an instance group) that
are a part of this standalone VPC network. After you create the
backend instances, you can follow the remaining steps, as depicted in this
example, to create a backend service in the service project and connect it to
a URL map in another service project by using cross-project service
referencing.
### Configure the load balancer's backend components in service project B
In this section, you need to configure the following backend resources in
service project B:
- Managed instance group
- Health check
- Global backend service
#### Create a managed instance group backend
> [!NOTE]
> **Note:** When using Shared VPC to create a managed instance group, you need to define the [*Google APIs service account* as a Service Project
> Admin](https://docs.cloud.google.com/vpc/docs/provisioning-shared-vpc#migs-service-accounts) for the subnet in the Shared VPC host project.
The precursor to creating a managed instance group is the creation of an
instance template, which is a resource that you can use to create virtual
machine (VM) instances. Traffic from clients is load balanced to VMs in an
instance group. The managed instance group provides VMs that run the backend
servers of an external Application Load Balancer. In this example, the backends serve their own
hostnames.
### Console
**Create an instance template**
1. In the Google Cloud console, go to the Compute Engine
**Instance templates** page.
[Go to Instance templates](https://console.cloud.google.com/compute/instanceTemplates/list)
2. Click **Create instance template**.
3. For **Name** , enter `backend-template`.
4. In the **Boot disk** section, ensure that the boot disk is set to a Debian
image, such as **Debian GNU/Linux 12 (bookworm)** . Click **Change** to change the
image if necessary.
5. Expand the **Advanced options** section.
6. Expand the **Networking** section, and in the **Network tags** field, enter
`load-balanced-backend`.
7. For **Network interfaces** , select **Networks shared with me (from host
project: `HOST_PROJECT_ID)`**.
8. In the **Shared subnetwork** list, select the `lb-backend-subnet`
subnet from the `lb-network` network.
9. Expand the **Management** section, and in the **Automation** field,
specify the following startup script:
```console
#! /bin/bash
apt-get update
apt-get install apache2 -y
a2ensite default-ssl
a2enmod ssl
vm_hostname="$(curl -H "Metadata-Flavor:Google" \
http://metadata.google.internal/computeMetadata/v1/instance/name)"
echo "Page served from: $vm_hostname" | \
tee /var/www/html/index.html
systemctl restart apache2
```
10. Click **Create**.
**Create a managed instance group**
1. In the Google Cloud console, go to the Compute Engine
**Instance groups** page.
[Go to Instance groups](https://console.cloud.google.com/compute/instanceGroups/list)
2. Click **Create Instance Group**.
3. From the options, select **New managed instance group (stateless)**.
4. For the name of the instance group, enter `lb-backend`.
5. In the **Instance template** list, select the instance template
`backend-template` that you created in the previous step.
6. In the **Location** section, select **Single zone**, and enter the following
values:
- For **Region** , select `us-west1`.
- For **Zone** , select `us-west1-a`.
7. In the **Autoscaling** section, enter the following values:
- For **Autoscaling mode** , select **On: add and remove instances to the
group**.
- For **Minimum number of instances** , select `2`.
- For **Maximum number of instances** , select `3`.
8. In the **Port mapping** section, click **Add port**, and enter the
following values:
- For **Port name** , enter `http`.
- For **Port number** , enter `80`.
9. Click **Create**.
### gcloud
1. Create an instance template:
```
gcloud compute instance-templates create backend-template \
--region=us-west1 \
--network=projects/HOST_PROJECT_ID/global/networks/lb-network \
--subnet=projects/HOST_PROJECT_ID/regions/us-west1/subnetworks/lb-backend-subnet \
--tags=load-balanced-backend \
--image-family=debian-12 \
--image-project=debian-cloud \
--metadata=startup-script='#! /bin/bash
apt-get update
apt-get install apache2 -y
a2ensite default-ssl
a2enmod ssl
vm_hostname="$(curl -H "Metadata-Flavor:Google" \
http://metadata.google.internal/computeMetadata/v1/instance/name)"
echo "Page served from: $vm_hostname" | \
tee /var/www/html/index.html
systemctl restart apache2' \
--project=SERVICE_PROJECT_B_ID
```
2. Create a managed instance group and select the instance template that you
created in the preceding step:
```
gcloud compute instance-groups managed create lb-backend \
--zone=us-west1-a \
--size=2 \
--template=backend-template \
--project=SERVICE_PROJECT_B_ID
```
3. Add a named port to the instance group:
```
gcloud compute instance-groups set-named-ports lb-backend \
--named-ports=http:80 \
--zone=us-west1-a \
--project=SERVICE_PROJECT_B_ID
```
#### Create a health check
Health checks are tests that confirm the availability of backends. Create a
health check that uses the HTTP protocol and probes on port `80`. Later, you'll
attach this health check to the backend service referenced by the load balancer.
### Console
1. In the Google Cloud console, go to the Compute Engine
**Health checks** page.
[Go to Health checks](https://console.cloud.google.com/compute/healthChecks)
2. For the name of the health check, enter `lb-health-check`.
3. Set the protocol to **HTTP**.
4. Click **Create**.
### gcloud
Create an HTTP health check.
```
gcloud compute health-checks create http lb-health-check \
--use-serving-port \
--project=SERVICE_PROJECT_B_ID
```
#### Create a global backend service
Create a global backend service to distribute traffic among backends. As a part
of this step, you need to assign the health check that you created to the
backend service and add the instance group as the backend to the backend service.
### Console
1. In the Google Cloud console, go to the **Load balancing** page.
[Go to Load balancing](https://console.cloud.google.com/net-services/loadbalancing/list/backends)
2. Go to the **Backends** section.
3. Click **Create backend service**.
4. For **Global backend service** , click the **Create** button next to it.
5. For the name of the backend service, enter `cross-ref-backend-service`.
6. For **Backend type** , select **Instance group**.
7. Set **Protocol** to **HTTP**.
8. In the **Named port** field, enter `http`. This is the same port name that
you entered while creating the managed instance group.
9. To add *backends* to the backend service, do the following:
1. In the **Backends** section, set the **Instance group** to
`lb-backend`, which is the managed instance group that you
created in an earlier step.
2. For **Port numbers** , enter `80`.
3. To add the backend, click **Done**.
10. To add a health check, in the **Health check** list, select
`lb-health-check`, which is the health check that you created earlier.
11. Optional: In the **Add permissions** section, enter the
IAM principals from other projects (typically an email
address) that have the Compute Load Balancer Admin role
(`roles/compute.loadBalancerAdmin`) so that they can use this backend
service for load balancers in their own projects. Without this permission,
you can't use cross-project service referencing.
If you don't have permission to set access control policies for
backend services in this project, you can still create the backend
service now, and an authorized user can perform this step later as
described in the section, [Grant permissions to the Compute Load Balancer
Admin to use the backend service](https://docs.cloud.google.com/load-balancing/docs/https/set-up-global-ext-https-shared-vpc#grant-bs-user). That section also
describes how to grant access to all the backend services in this
project, so that you don't have to grant access every time you create
a new backend service.
12. To create the backend service, click **Create**.
### gcloud
1. Create a global backend service to distribute traffic among backends:
```
gcloud compute backend-services create cross-ref-backend-service \
--load-balancing-scheme=EXTERNAL_MANAGED \
--protocol=HTTP \
--port-name=http \
--health-checks=lb-health-check \
--global \
--project=SERVICE_PROJECT_B_ID
```
2. Add your instance group as the backend to the backend service:
```
gcloud compute backend-services add-backend cross-ref-backend-service \
--instance-group=lb-backend \
--instance-group-zone=us-west1-a \
--global \
--project=SERVICE_PROJECT_B_ID
```
### Configure the load balancer's frontend components in service project A
In this section, you need to configure the following frontend resources in
service project A:
- IP address
- SSL certificate
- URL map
- Target proxy
- Forwarding rule
#### Reserve the load balancer's IP address
Reserve a global static external IP address that can be assigned to the
forwarding rule of the load balancer.
### Console
1. In the Google Cloud console, go to the VPC
**IP addresses** page.
[Go to IP addresses](https://console.cloud.google.com/networking/addresses/list)
2. Click **Reserve external**.
3. On the **Reserve external static IP address** page, for **Name** , enter
`cross-ref-ip-address`.
4. Set **Network Service Tier** to **Premium**.
5. Set **IP version** to **IPv4**.
6. Set **Type** to **Global**.
7. Click **Reserve**.
### gcloud
Create a global static external IP address.
```
gcloud compute addresses create cross-ref-ip-address \
--ip-version=IPV4 \
--network-tier=PREMIUM \
--global \
--project=SERVICE_PROJECT_A_ID
```
#### Set up an SSL certificate resource
To create the load balancer, you must have an [SSL certificate resource](https://docs.cloud.google.com/load-balancing/docs/ssl-certificates.md.txt) that can be attached to the target
proxy. The SSL certificate resource can be either a certificate map or a
Compute Engine SSL certificate (classic certificate).
#### Certificate map
You can create a certificate map as described in
one of the following documents:
- [Deploy a global Google-managed certificate with load balancer authorization](https://docs.cloud.google.com/certificate-manager/docs/deploy-google-managed-lb-auth.md.txt)
- [Deploy a global Google-managed certificate with DNS authorization](https://docs.cloud.google.com/certificate-manager/docs/deploy-google-managed-dns-auth.md.txt)
- [Deploy a global Google-managed certificate with Certificate Authority Service](https://docs.cloud.google.com/certificate-manager/docs/deploy-google-managed-cas.md.txt)
- [Deploy a global self-managed certificate](https://docs.cloud.google.com/certificate-manager/docs/deploy-self-managed.md.txt)
#### Compute Engine SSL certificate
For an HTTPS load balancer, create a Compute Engine SSL certificate resource
as described in one of the following documents:
- [Use self-managed SSL
certificates](https://docs.cloud.google.com/load-balancing/docs/ssl-certificates/self-managed-certs)
- [Use Google-managed SSL
certificates](https://docs.cloud.google.com/load-balancing/docs/ssl-certificates/google-managed-certs)
We recommend using a Google-managed certificate.
> [!WARNING]
> **Warning:** Don't use a self-signed certificate for production purposes.
#### Create the frontend components
### Console
#### Select the load balancer type
1. In the Google Cloud console, go to the **Load balancing** page.
[Go to Load balancing](https://console.cloud.google.com/net-services/loadbalancing/list)
2. Click **Create load balancer**.
3. For **Type of load balancer** , select **Application Load Balancer
(HTTP/HTTPS)** and click **Next**.
4. For **Public facing or internal** , select **Public facing
(external)** and click **Next**.
5. For **Global or single region deployment** , select **Best for global
workloads** and click **Next**.
6. For **Load balancer generation** , select **Global external
Application Load Balancer** and click **Next**.
7. Click **Configure**.
#### Basic configuration
1. Enter the **Name** of the load balancer: `cross-ref-lb-shared-vpc`.
2. Keep the page open to continue.
#### Configure the frontend
**For HTTP:**
1. Click **Frontend configuration**.
2. Enter a **Name** for the forwarding rule: `cross-ref-http-forwarding-rule`.
3. Set the **Protocol** to `HTTP`.
4. Select the **IP address** that you created in [Reserve the load balancer's IP address](https://docs.cloud.google.com/load-balancing/docs/https/set-up-global-ext-https-shared-vpc.md.txt#cross-project-ip-address), called **cross-ref-ip-address**.
5. Set the **Port** to `80`.
6. Click **Done**.
**For HTTPS:**
If you are using HTTPS between the client and the load balancer,
you need one or more SSL certificate resources to configure the proxy.
1. Click **Frontend configuration**.
2. Enter a **Name** for the forwarding rule: `cross-ref-https-forwarding-rule`.
3. In the **Protocol** field, select `HTTPS (includes HTTP/2)`.
4. Select the **IP address** that you created in [Reserve the load balancer's IP address](https://docs.cloud.google.com/load-balancing/docs/https/set-up-global-ext-https-shared-vpc.md.txt#cross-project-ip-address), called **cross-ref-ip-address**.
5. Ensure that the **Port** is set to `443` to allow HTTPS traffic.
6. For **Choose certificate repository** , select **Use certificate map** or **Use classic certificates**.
7. Depending on your selection, select a certificate map or a classic certificate.
8. Click **Done**.
#### Configure the backend
1. Click **Backend configuration**.
2. Click **Cross-project backend services**.
3. For **Project ID** , enter the [project
ID](https://docs.cloud.google.com/resource-manager/docs/creating-managing-projects#identifying_projects) for service project B.
4. From the **Select backend services** list, select the backend services from service project B that you want to use. For this example, you enter `cross-ref-backend-service`.
5. Click **OK**.
### Configure the routing rules
- Click **Routing rules** . Ensure that the **cross-ref-backend-service** is the only backend service for any unmatched host and any unmatched path.
For information about traffic management, see [Set up traffic
management](https://docs.cloud.google.com/load-balancing/docs/https/setting-up-reg-traffic-mgmt).
#### Review and finalize the configuration
- Click **Create**.
### gcloud
1. Optional: Before creating a load balancer with cross-referencing backend
services, find out whether the backend services you want to refer to can be
referenced using a URL map:
```
gcloud compute backend-services list-usable \
--global \
--project=SERVICE_PROJECT_B_ID
```
2. Create a URL map to route incoming requests to the backend service:
```
gcloud compute url-maps create cross-ref-url-map \
--default-service=projects/SERVICE_PROJECT_B_ID/global/backendServices/cross-ref-backend-service \
--global \
--project=SERVICE_PROJECT_A_ID
```
3. Create a target proxy.
**For HTTP traffic**, create a target HTTP proxy to route
requests to the URL map:
```
gcloud compute target-http-proxies create cross-ref-http-proxy \
--url-map=cross-ref-url-map \
--global \
--project=SERVICE_PROJECT_A_ID
```
**For HTTPS traffic** , create a target HTTPS proxy to route
requests to the URL map. The proxy is the part of the load
balancer that holds the SSL certificate for an HTTPS load
balancer, so you also load your
[SSL certificate](https://docs.cloud.google.com/load-balancing/docs/https/set-up-global-ext-https-shared-vpc.md.txt#cross-project-ssl) in this step:
```
gcloud compute target-https-proxies create cross-ref-https-proxy \
--url-map=cross-ref-url-map \
--ssl-certificates=lb-ssl-cert \
--global \
--project=SERVICE_PROJECT_A_ID
```
4. Create a forwarding rule.
**For HTTP traffic**, create a global forwarding rule to route
incoming requests to the target proxy:
```
gcloud compute forwarding-rules create cross-ref-http-forwarding-rule \
--load-balancing-scheme=EXTERNAL_MANAGED \
--address=cross-ref-ip-address \
--global \
--target-http-proxy=cross-ref-http-proxy \
--ports=80 \
--project=SERVICE_PROJECT_A_ID
```
**For HTTPS traffic**, create a global forwarding rule to route
incoming requests to the target proxy:
```
gcloud compute forwarding-rules create cross-ref-https-forwarding-rule \
--load-balancing-scheme=EXTERNAL_MANAGED \
--address=cross-ref-ip-address \
--global \
--target-https-proxy=cross-ref-https-proxy \
--ports=443 \
--project=SERVICE_PROJECT_A_ID
```
### Grant permissions to the Compute Load Balancer Admin to use the backend service
If you want load balancers to reference backend services in other service
projects, the Load Balancer Admin must have the `compute.backendServices.use`
permission. To grant this permission, you can use the predefined
IAM role called
Compute Load Balancer Services User (`roles/compute.loadBalancerServiceUser`).
This role must be granted by the Service Project Admin and can be applied at
the project level or at the individual backend service level.
This step is *not required* if you already granted the required permissions
at the backend service level while [creating the backend
service](https://docs.cloud.google.com/load-balancing/docs/https/set-up-global-ext-https-shared-vpc#create-cross-project-bs). You can either skip this section or continue
reading to learn how to grant access to all the backend services in this
project so that you don't have to grant access every time you create a new
backend service.
In this example, a Service Project Admin from service project B must run *one*
of the following commands to grant the `compute.backendServices.use` permission
to a Load Balancer Admin from service project A. This can be done either at the
project level (for all backend services in the project) or per backend service.
### Console
#### Project-level permissions
Use the following steps to grant permissions to all backend services in
your project.
You require the `compute.backendServices.setIamPolicy` and the
`resourcemanager.projects.setIamPolicy` permissions to complete this step.
1. In the Google Cloud console, go to the **IAM** page.
[Go to IAM](https://console.cloud.google.com/projectselector/iam-admin/iam?supportedpurview)
2. Select your project.
3. Click **Grant
access**.
4. In the **New principals** field, enter the principal's email address or
other identifier.
5. In the **Select a role** list, select the **Compute Load Balancer
Services User**.
6. Optional: Add a [condition](https://docs.cloud.google.com/iam/docs/conditions-overview.md.txt) to the role.
7. Click **Save**.
#### Resource-level permissions for individual backend services
Use the following steps to grant permissions to individual backend
services in your project.
You require the `compute.backendServices.setIamPolicy` permission to
complete this step.
1. In the Google Cloud console, go to the **Backends** page.
[Go to Backends](https://console.cloud.google.com/loadbalancing/list/backends)
2. From the backends list, select the backend service that you want to
grant access to and click
**Permissions**.
3. Click **Add principal**.
4. In the **New principals** field, enter the principal's email address or
other identifier.
5. In the **Select a role** list, select the **Compute Load Balancer
Services User**.
6. Click **Save**.
### gcloud
#### Project-level permissions
Use the following steps to grant permissions to all backend services in
your project.
You require the `compute.backendServices.setIamPolicy` and the
`resourcemanager.projects.setIamPolicy` permissions to complete this step.
```
gcloud projects add-iam-policy-binding SERVICE_PROJECT_B_ID \
--member="user:LOAD_BALANCER_ADMIN" \
--role="roles/compute.loadBalancerServiceUser"
```
#### Resource-level permissions for individual backend services
At the backend service level, Service Project Admins can use *either of the
following commands* to grant the Compute Load Balancer Services User role
(`roles/compute.loadBalancerServiceUser`).
You require the `compute.backendServices.setIamPolicy` permission to
complete this step.
```
gcloud projects add-iam-policy-binding SERVICE_PROJECT_B_ID \
--member="user:LOAD_BALANCER_ADMIN" \
--role="roles/compute.loadBalancerServiceUser" \
--condition='expression=resource.name=="projects/SERVICE_PROJECT_B_ID/regions/us-west1/backend-services/BACKEND_SERVICE_NAME",title=Shared VPC condition'
```
or
```
gcloud compute backend-services add-iam-policy-binding BACKEND_SERVICE_NAME \
--member="user:LOAD_BALANCER_ADMIN" \
--role="roles/compute.loadBalancerServiceUser" \
--project=SERVICE_PROJECT_B_ID \
--region=us-west1
```
To use these commands, replace `LOAD_BALANCER_ADMIN` with the
user's [principal](https://docs.cloud.google.com/sdk/gcloud/reference/projects/add-iam-policy-binding#--member)---for
example, `test-user@gmail.com`.
You can also configure IAM permissions so that they only apply
to a subset of regional backend services by using conditions and
specifying [condition attributes](https://docs.cloud.google.com/iam/docs/conditions-overview.md.txt#attributes).
### Test the load balancer
It can take several minutes for the load balancer to be configured. When the
load balancing service is running, you can send traffic to the forwarding rule
in *service project A* and watch the traffic be dispersed to different VM
instances in *service project B*.
### Console
1. In the Google Cloud console, go to the **Load balancing** page
in *service project A*.
[Go to Load balancing](https://console.cloud.google.com/net-services/loadbalancing/list/loadBalancers)
2. Click the load balancer that you just created.
3. Note the load balancer's IP address. This IP address is referred to as
`LB_IP_ADDRESS` in the following steps.
4. You can test your load balancer by pointing your web browser to
`https://LB_IP_ADDRESS` (or
`http://LB_IP_ADDRESS`). Replace
`LB_IP_ADDRESS` with the [load balancer's IP
address](https://docs.cloud.google.com/load-balancing/docs/https/set-up-global-ext-https-shared-vpc#reserve-ip).
5. If you used a self-signed certificate for testing HTTPS, your browser
displays a warning. You must explicitly instruct your browser to accept a
self-signed certificate.
6. Your browser should render a page with content showing the name of the
instance that served the page (for example, `Page served from:
lb-backend-example-xxxx`). If your browser doesn't render this page,
review the configuration settings in this guide.
### gcloud
Note the IP address that was reserved:
```
gcloud compute addresses describe IP_ADDRESS_NAME \
--format="get(address)" \
--global
--project=SERVICE_PROJECT_A_ID
```
You can test your load balancer by pointing your web browser to
`https://LB_IP_ADDRESS` (or
`http://LB_IP_ADDRESS`). Replace
`LB_IP_ADDRESS` with the [load balancer's IP
address](https://docs.cloud.google.com/load-balancing/docs/https/set-up-global-ext-https-shared-vpc#reserve-ip).
If you used a self-signed certificate for testing HTTPS, your browser
displays a warning. You must explicitly instruct your browser to accept a
self-signed certificate.
Your browser should render a page with minimal information about the backend
instance. If your browser doesn't render this page, review the configuration
settings in this guide.
## What's next
- Restrict how Shared VPC features such as cross-project service referencing are used in your project by using [organization policy constraints for
Cloud Load Balancing](https://docs.cloud.google.com/load-balancing/docs/org-policy-constraints).
- Learn how to [troubleshoot issues with a global external Application Load Balancer](https://docs.cloud.google.com/load-balancing/docs/https/troubleshooting-ext-https-lbs.md.txt).
- [Clean up your load balancing setup](https://docs.cloud.google.com/load-balancing/docs/cleaning-up-lb-setup.md.txt).