This setup guide shows you how to create a classic Application Load Balancer with a [Compute Engine managed instance group](https://docs.cloud.google.com/compute/docs/instance-groups.md.txt) backend.
For general concepts, see the
[External Application Load Balancer overview](https://docs.cloud.google.com/load-balancing/docs/https.md.txt).
If you are an existing user of the classic Application Load Balancer, make sure that you
review [Migration
overview](https://docs.cloud.google.com/load-balancing/docs/https/migrate-to-global) when you plan a new deployment with the global external Application Load Balancer.
## Load balancer topologies
For an HTTPS load balancer, you create the configuration shown in
the following diagram.
[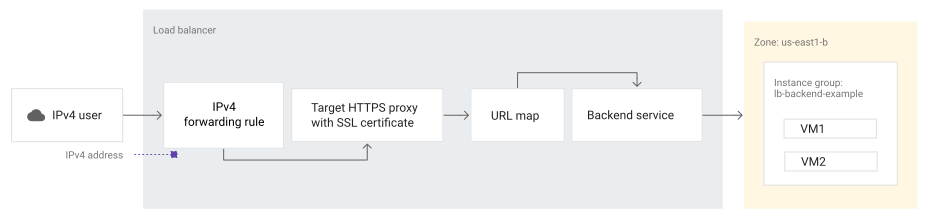](https://docs.cloud.google.com/static/load-balancing/images/https-load-balancer-simple.svg) **Figure 1.** External Application Load Balancer with a managed instance group (MIG) backend (click to enlarge).
For an HTTP load balancer, you create the configuration shown in
the following diagram.
[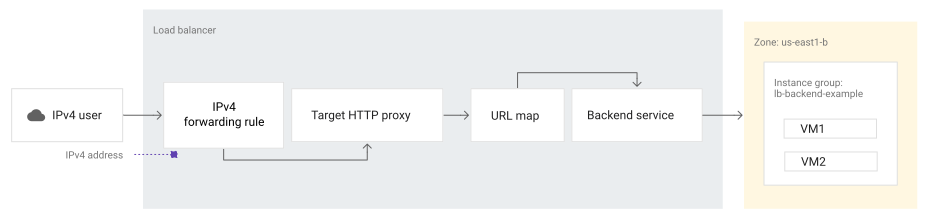](https://docs.cloud.google.com/static/load-balancing/images/http-load-balancer-simple.svg) **Figure 2.** External Application Load Balancer with a managed instance group (MIG) backend (click to enlarge).
The sequence of events in the diagrams are as follows:
1. A client sends a content request to the external IPv4 address defined in the [forwarding rule](https://docs.cloud.google.com/load-balancing/docs/forwarding-rule-concepts.md.txt).
2. For an HTTPS load balancer, the forwarding rule directs the request to the
[target HTTPS proxy](https://docs.cloud.google.com/load-balancing/docs/target-proxies.md.txt).
For an HTTP load balancer, the forwarding rule directs the request to the
[target HTTP proxy](https://docs.cloud.google.com/load-balancing/docs/target-proxies.md.txt).
3. The target proxy uses the rule in the [URL
map](https://docs.cloud.google.com/load-balancing/docs/url-map-concepts) to determine that the
single backend service receives all requests.
4. The load balancer determines that the [backend
service](https://docs.cloud.google.com/load-balancing/docs/backend-service) has only one instance
group and directs the request to a virtual machine (VM) instance in that
group.
5. The VM serves the content requested by the user.
## Before you begin
Complete the following steps before you create the load balancer.
### Set up an SSL certificate resource
To create the load balancer, you must have an [SSL certificate resource](https://docs.cloud.google.com/load-balancing/docs/ssl-certificates.md.txt) that can be attached to the target
proxy. The SSL certificate resource can be either a certificate map or a
Compute Engine SSL certificate (classic certificate).
#### Certificate map
You can create a certificate map as described in
one of the following documents:
- [Deploy a global Google-managed certificate with load balancer authorization](https://docs.cloud.google.com/certificate-manager/docs/deploy-google-managed-lb-auth.md.txt)
- [Deploy a global Google-managed certificate with DNS authorization](https://docs.cloud.google.com/certificate-manager/docs/deploy-google-managed-dns-auth.md.txt)
- [Deploy a global Google-managed certificate with Certificate Authority Service](https://docs.cloud.google.com/certificate-manager/docs/deploy-google-managed-cas.md.txt)
- [Deploy a global self-managed certificate](https://docs.cloud.google.com/certificate-manager/docs/deploy-self-managed.md.txt)
#### Compute Engine SSL certificate
For an HTTPS load balancer, create a Compute Engine SSL certificate resource
as described in one of the following documents:
- [Use self-managed SSL
certificates](https://docs.cloud.google.com/load-balancing/docs/ssl-certificates/self-managed-certs)
- [Use Google-managed SSL
certificates](https://docs.cloud.google.com/load-balancing/docs/ssl-certificates/google-managed-certs)
We recommend using a Google-managed certificate.
> [!WARNING]
> **Warning:** Don't use a self-signed certificate for production purposes.
### Set up permissions
To complete the steps in this guide, you must have permission to create
Compute Engine instances, firewall rules, and reserved IP addresses in a
project. You must have either a project [owner or editor
role](https://docs.cloud.google.com/iam/docs/roles-overview#basic), or you must have the following
[Compute Engine IAM roles](https://docs.cloud.google.com/compute/docs/access/iam.md.txt).
| Task | Required role |
|---|---|
| Create instances | [Instance Admin](https://docs.cloud.google.com/compute/docs/access/iam.md.txt#compute.instanceAdmin) |
| Add and remove firewall rules | [Security Admin](https://docs.cloud.google.com/compute/docs/access/iam.md.txt#compute.securityAdmin) |
| Create load balancer components | [Network Admin](https://docs.cloud.google.com/compute/docs/access/iam.md.txt#compute.networkAdmin) |
| Create a project (optional) | [Project Creator](https://docs.cloud.google.com/resource-manager/docs/creating-managing-projects.md.txt#creating_a_project) |
For more information, see the following guides:
- [Access control](https://docs.cloud.google.com/load-balancing/docs/access-control.md.txt)
- [IAM Conditions](https://docs.cloud.google.com/load-balancing/docs/access-control/iam-conditions.md.txt)
### Optional: Use BYOIP addresses
With bring your own IP (BYOIP), you can import your own public addresses to
Google Cloud to use the addresses with Google Cloud resources. For
example, if you import your own IPv4 addresses, you can assign one to the
forwarding rule when you configure your load balancer. When you follow the
instructions in this document to
[set up the load balancer](https://docs.cloud.google.com/load-balancing/docs/https/ext-https-lb-simple.md.txt#load-balancer), provide the BYOIP address as the
**IP address**.
For more information about using BYOIP, see
[Bring your own IP addresses](https://docs.cloud.google.com/vpc/docs/bring-your-own-ip.md.txt).
## Configure the network and subnets
To create the example network and subnet, follow these steps.
### Console
1. In the Google Cloud console, go to the **VPC networks** page.
[Go to VPC networks](https://console.cloud.google.com/networking/networks/list)
2. Click **Create VPC network**.
3. Enter a **Name** for the network.
4. For the **Subnet creation mode** , choose **Custom**.
5. In the **New subnet** section, configure the following fields:
1. Provide a **Name** for the subnet.
2. Select a **Region**.
3. For **IP stack type** , select **IPv4 (single-stack)**.
4. Enter an **IP address range** . This is the [primary IPv4
range](https://docs.cloud.google.com/vpc/docs/vpc#vpc_networks_and_subnets) for the subnet.
6. Click **Done**.
7. To add a subnet in a different region, click **Add subnet** and repeat
the previous steps.
8. Click **Create**.
### gcloud
1. Create the custom mode VPC network:
```
gcloud compute networks create NETWORK \
--subnet-mode=custom
```
2. Within the network, create a subnet for backends:
```
gcloud compute networks subnets create SUBNET \
--network=NETWORK \
--stack-type=IPV4_ONLY \
--range=10.1.2.0/24 \
--region=REGION
```
Replace the following:
- `NETWORK`: a name for the VPC network.
- `SUBNET`: a name for the subnet.
- `REGION`: the name of the region.
## Create a managed instance group
To set up a load balancer with a Compute Engine backend, your VMs need
to be in an instance group. This guide describes how to create a managed
instance group with Linux VMs that have Apache running, and then set up load
balancing. A managed instance group creates each of its managed instances based
on the instance templates that you specify.
The managed instance group provides VMs running the backend servers of
an external HTTP(S) load balancer. For demonstration purposes, backends
serve their own hostnames.
Before you create a managed instance group, create an instance template.
### Console
To support **IPv4 traffic**, use the following steps:
1. In the Google Cloud console, go to the **Instance templates** page.
[Go to Instance templates](https://console.cloud.google.com/compute/instanceTemplates/list)
2. Click **Create instance template**.
3. For **Name** , enter `lb-backend-template`.
4. Ensure that the Boot disk is set to a Debian image, such as
**Debian GNU/Linux 10 (buster)** . These instructions use commands that
are only available on Debian, such as `apt-get`.
5. Expand **Advanced options**.
6. Expand **Networking** and configure the following fields:
1. For **Network tags** , enter `allow-health-check`.
2. In the **Network interfaces** section, click **Edit** and make the following changes:
- **Network** : `NETWORK`
- **Subnet** : `SUBNET`
- **IPv4 traffic** : **IPv4 (single-stack)**
3. Click **Done**.
7. Expand **Management** . In the **Startup script** field, enter the
following script:
```
#! /bin/bash
apt-get update
apt-get install apache2 -y
a2ensite default-ssl
a2enmod ssl
vm_hostname="$(curl -H "Metadata-Flavor:Google" \
http://metadata.google.internal/computeMetadata/v1/instance/name)"
echo "Page served from: $vm_hostname" | \
tee /var/www/html/index.html
systemctl restart apache2
```
8. Click **Create**.
### gcloud
To support **IPv4 traffic**, run the following command:
```
gcloud compute instance-templates create TEMPLATE_NAME \
--region=REGION \
--network=NETWORK \
--subnet=SUBNET \
--stack-type=IPV4_ONLY \
--tags=allow-health-check \
--image-family=debian-10 \
--image-project=debian-cloud \
--metadata=startup-script='#! /bin/bash
apt-get update
apt-get install apache2 -y
a2ensite default-ssl
a2enmod ssl
vm_hostname="$(curl -H "Metadata-Flavor:Google" \
http://metadata.google.internal/computeMetadata/v1/instance/name)"
echo "Page served from: $vm_hostname" | \
tee /var/www/html/index.html
systemctl restart apache2'
```
### Terraform
To create the instance template, use the [`google_compute_instance_template`
resource](https://registry.terraform.io/providers/hashicorp/google/latest/docs/resources/compute_instance_template).
```terraform
resource "google_compute_instance_template" "default" {
name = "lb-backend-template"
disk {
auto_delete = true
boot = true
device_name = "persistent-disk-0"
mode = "READ_WRITE"
source_image = "projects/debian-cloud/global/images/family/debian-13"
type = "PERSISTENT"
}
labels = {
managed-by-cnrm = "true"
}
machine_type = "n1-standard-1"
metadata = {
startup-script = "#! /bin/bash\n sudo apt-get update\n sudo apt-get install apache2 -y\n sudo a2ensite default-ssl\n sudo a2enmod ssl\n vm_hostname=\"$(curl -H \"Metadata-Flavor:Google\" \\\n http://169.254.169.254/computeMetadata/v1/instance/name)\"\n sudo echo \"Page served from: $vm_hostname\" | \\\n tee /var/www/html/index.html\n sudo systemctl restart apache2"
}
network_interface {
access_config {
network_tier = "PREMIUM"
}
network = "global/networks/default"
subnetwork = "regions/us-east1/subnetworks/default"
}
region = "us-east1"
scheduling {
automatic_restart = true
on_host_maintenance = "MIGRATE"
provisioning_model = "STANDARD"
}
service_account {
email = "default"
scopes = ["https://www.googleapis.com/auth/devstorage.read_only", "https://www.googleapis.com/auth/logging.write", "https://www.googleapis.com/auth/monitoring.write", "https://www.googleapis.com/auth/pubsub", "https://www.googleapis.com/auth/service.management.readonly", "https://www.googleapis.com/auth/servicecontrol", "https://www.googleapis.com/auth/trace.append"]
}
tags = ["allow-health-check"]
}
```
Create the managed instance group and select the instance template.
### Console
1. In the Google Cloud console, go to the **Instance groups** page.
[Go to Instance groups](https://console.cloud.google.com/compute/instanceGroups)
2. Click **Create instance group**.
3. On the left, choose **New managed instance group (stateless)**.
4. For **Name** , enter `lb-backend-example`.
5. Under **Location** , select **Single zone**.
6. For **Region**, select your preferred region.
7. For **Zone**, select a zone.
8. Under **Instance template** , select the instance template `lb-backend-template`.
9. For **Autoscaling mode** , select **On: add and remove instances to the
group**.
Set **Minimum number of instances** to `2`, and set **Maximum number of
instances** to `2` or more.
10. To create the new instance group, click **Create**.
### gcloud
1. Create the managed instance group based on the template.
```
gcloud compute instance-groups managed create lb-backend-example \
--template=TEMPLATE_NAME --size=2 --zone=ZONE_A
```
### Terraform
To create the managed instance group, use the [`google_compute_instance_group_manager`
resource](https://registry.terraform.io/providers/hashicorp/google/latest/docs/resources/compute_instance_group_manager).
```terraform
resource "google_compute_instance_group_manager" "default" {
name = "lb-backend-example"
zone = "us-east1-b"
named_port {
name = "http"
port = 80
}
version {
instance_template = google_compute_instance_template.default.id
name = "primary"
}
base_instance_name = "vm"
target_size = 2
}
```
To learn how to apply or remove a Terraform configuration, see
[Basic Terraform commands](https://docs.cloud.google.com/docs/terraform/basic-commands.md.txt).
## Add a named port to the instance group
For your instance group, define an HTTP service and map a port name
to the relevant port. The load balancing service forwards
traffic to the named port. For more information, see [Named ports](https://docs.cloud.google.com/load-balancing/docs/backend-service.md.txt#named_ports).
### Console
1. In the Google Cloud console, go to the **Instance groups** page.
[Go to Instance groups](https://console.cloud.google.com/compute/instanceGroups)
2. Click **lb-backend-example**.
3. On the instance group's **Overview** page, click
**Edit**.
4. In the **Port mapping** section, click **Add port**.
1. For the port name, enter `http`. For the port number, enter `80`.
5. Click **Save**.
### gcloud
Use the [`gcloud compute instance-groups
set-named-ports`](https://docs.cloud.google.com/sdk/gcloud/reference/compute/instance-groups/set-named-ports)
command.
```
gcloud compute instance-groups set-named-ports lb-backend-example \
--named-ports http:80 \
--zone ZONE_A
```
### Terraform
The `named_port` attribute is included in the
[managed instance group sample](https://docs.cloud.google.com/load-balancing/docs/https/ext-https-lb-simple.md.txt#mig).
## Configure a firewall rule
In this example, you create the `fw-allow-health-check` firewall rule.
This is an ingress rule that allows traffic from the [Google Cloud health
checking systems](https://docs.cloud.google.com/load-balancing/docs/health-check-concepts#ip-ranges).
This example uses the target tag `allow-health-check` to identify the VMs.
### Console
1. In the Google Cloud console, go to the **Firewall policies** page.
[Go to Firewall policies](https://console.cloud.google.com/net-security/firewall-manager/firewall-policies/list)
2. Click **Create firewall rule** to create the firewall rule.
3. For **Name** , enter `fw-allow-health-check`.
4. Select a **Network**.
5. Under **Targets** , select **Specified target tags**.
6. Populate the **Target tags** field with `allow-health-check`.
7. Set **Source filter** to **IPv4 ranges**.
8. Set **Source IPv4 ranges** to `35.191.0.0/16`.
9. Under **Protocols and ports** , select **Specified protocols and ports**.
10. Select the **TCP** checkbox, and then type `80` for the port
numbers.
11. Click **Create**.
### gcloud
gcloud compute firewall-rules create fw-allow-health-check \
--network=NETWORK \
--action=allow \
--direction=ingress \
--source-ranges=35.191.0.0/16 \
--target-tags=allow-health-check \
--rules=tcp:80
### Terraform
To create the firewall rule, use the [`google_compute_firewall`
resource](https://registry.terraform.io/providers/hashicorp/google/latest/docs/resources/compute_firewall).
```terraform
resource "google_compute_firewall" "default" {
name = "fw-allow-health-check"
direction = "INGRESS"
network = "global/networks/default"
priority = 1000
source_ranges = ["35.191.0.0/16"]
target_tags = ["allow-health-check"]
allow {
ports = ["80"]
protocol = "tcp"
}
}
```
To learn how to apply or remove a Terraform configuration, see
[Basic Terraform commands](https://docs.cloud.google.com/docs/terraform/basic-commands.md.txt).
## Reserve an external IP address
Now that your instances are up and running, set up a [global static external IP
address](https://docs.cloud.google.com/compute/docs/ip-addresses#externaladdresses) that your customers use
to reach your load balancer.
### Console
1. In the Google Cloud console, go to the **IP addresses** page.
[Go to IP addresses](https://console.cloud.google.com/networking/addresses/list)
2. To reserve an IPv4 address, click **Reserve external**.
3. On the **Reserve external static IP address** page, for **Name** ,
enter `lb-ipv4-1`.
4. Set **Network Service Tier** to **Premium**.
5. Set **IP version** to **IPv4**.
6. Set **Type** to **Global**.
7. Click **Reserve**.
### gcloud
```
gcloud compute addresses create lb-ipv4-1 \
--ip-version=IPV4 \
--network-tier=PREMIUM \
--global
```
Note the IPv4 address that was reserved:
```
gcloud compute addresses describe lb-ipv4-1 \
--format="get(address)" \
--global
```
### Terraform
To reserve the IP address, use the [`google_compute_global_address`
resource](https://registry.terraform.io/providers/hashicorp/google/latest/docs/resources/compute_global_address).
```terraform
resource "google_compute_global_address" "default" {
name = "lb-ipv4-1"
ip_version = "IPV4"
}
```
To learn how to apply or remove a Terraform configuration, see
[Basic Terraform commands](https://docs.cloud.google.com/docs/terraform/basic-commands.md.txt).
## Set up the load balancer
In this example, you are using HTTPS (frontend) between the client and the load
balancer. For HTTPS, you need one or more [SSL certificate resources](https://docs.cloud.google.com/load-balancing/docs/https/ext-https-lb-simple.md.txt#ssl-cert)
to configure the proxy. We recommend using a Google-managed certificate.
Even if you're using HTTPS on the frontend, you can use HTTP on the backend.
Google [automatically encrypts traffic between Google Front Ends (GFEs) and your
backends](https://docs.cloud.google.com/load-balancing/docs/ssl-certificates/encryption-to-the-backends)
that reside within Google Cloud VPC networks.
### Console
#### Select the load balancer type
1. In the Google Cloud console, go to the **Load balancing** page.
[Go to Load balancing](https://console.cloud.google.com/net-services/loadbalancing/list)
2. Click **Create load balancer**.
3. For **Type of load balancer** , select **Application Load Balancer
(HTTP/HTTPS)** and click **Next**.
4. For **Public facing or internal** , select **Public facing
(external)** and click **Next**.
5. For **Global or single region deployment** , select **Best for global
workloads** and click **Next**.
6. For **Load balancer generation** , select **Classic
Application Load Balancer** and click **Next**.
7. Click **Configure**.
**Basic configuration**
For the load balancer **Name** , enter something like
`web-map-https` or `web-map-http`.
**Frontend configuration**
1. Click **Frontend configuration**.
2. Set **Protocol** to **HTTPS**.
3. Select `IPv4` for IPv4 traffic. Set **IP address** to `lb-ipv4-1`, which you created earlier.
4. Set **Port** to **443**.
5. For **Choose certificate repository** , select **Use certificate map** or **Use classic certificates**.
6. Depending on your selection, select a certificate map or a classic certificate.
7. Optional: Create an SSL policy:
1. In the **SSL policy** list, select **Create a
policy**.
2. Set the name of the SSL policy to `my-ssl-policy`.
3. For **Minimum TLS Version** , select **TLS 1.0**.
4. For **Profile** , select **Modern** . The **Enabled features** and **Disabled features** are displayed.
5. Click **Save**.
If you have not created any SSL policies, a [default SSL policy](https://docs.cloud.google.com/load-balancing/docs/ssl-policies-concepts.md.txt#default-ssl-policy) is applied.
8. Optional: Select the **Enable HTTP to HTTPS Redirect** checkbox to enable redirects.
Enabling this checkbox creates an additional partial HTTP load
balancer that uses the same IP address as your HTTPS load
balancer and redirects incoming HTTP requests to your load
balancer's HTTPS frontend.
This checkbox can only be selected when the HTTPS protocol
is selected and a reserved IP address is used.
9. Click **Done**.
**Backend configuration**
1. Click **Backend configuration**.
2. Under **Backend services \& backend buckets** , select **Create a
backend service**.
3. Add a name for your backend service, such as `web-backend-service`.
4. Go to the **Security** section, and then select **Enable
IAP to secure access to your applications** .
Cloud CDN and IAP are not compatible. If you
have Cloud CDN enabled, and you select to enable
IAP, Cloud CDN is automatically disabled.
5. Optional: Configure a default backend security policy. The default security
policy throttles traffic over a user-configured threshold. For more
information about default security policies, see the
[Rate limiting overview](https://docs.cloud.google.com/armor/docs/rate-limiting-overview.md.txt#default-policy).
1. To opt out of the Cloud Armor default security policy, select `None` in the **Cloud Armor backend security policy** list.
2. To configure the Cloud Armor default security policy, select **Default security policy** in the **Cloud Armor backend security policy** list.
3. In the **Policy name** field, accept the automatically generated name or enter a name for your security policy.
4. In the **Request count** field, accept the default request count or enter an integer between `1` and `10,000`.
5. In the **Interval** field, select an interval.
6. In the **Enforce on key** field, choose one of the following values: **All** , **IP address** , or **X-Forwarded-For IP address** . For more information about these options, see [Identifying clients for rate limiting](https://docs.cloud.google.com/armor/docs/rate-limiting-overview.md.txt#identifying_clients_for_rate_limiting).
6. Retain the other default settings.
7. Click **Create**.
**Host and path rules**
For **Host and path rules**, retain the default settings.
**Review and finalize**
1. Click **Review and finalize**.
2. Review your load balancer configuration settings.
3. Optional: Click **Equivalent code** to view the REST API request that will be used to create the load balancer.
4. Click **Create**.
Wait for the load balancer to be created.
If you created an HTTPS load balancer and selected the
**Enable HTTP to HTTPS Redirect** checkbox, you will also see
an HTTP load balancer created with a *-redirect* suffix.
1. Click the name of the load balancer.
2. On the **Load balancer details** screen, note the **IP:Port** for your load balancer.
### gcloud
1. Create a health check.
```
gcloud compute health-checks create http http-basic-check \
--port 80
```
2. Create a backend service.
```
gcloud compute backend-services create web-backend-service \
--load-balancing-scheme=EXTERNAL \
--protocol=HTTP \
--port-name=http \
--health-checks=http-basic-check \
--global
```
3. Add your instance group as the backend to the backend service.
```
gcloud beta compute backend-services add-backend web-backend-service \
--instance-group=lb-backend-example \
--instance-group-zone=ZONE_A \
--global
```
4. For HTTP, create a URL map to route the incoming requests to the default backend service.
```
gcloud beta compute url-maps create web-map-http \
--default-service web-backend-service
```
5. For HTTPS, create a URL map to route the incoming requests to the default backend service.
```
gcloud beta compute url-maps create web-map-https \
--default-service web-backend-service
```
**Set up an HTTPS frontend**
Skip this section for HTTP load balancers.
1. For HTTPS, if you haven't already done so, create the global SSL certificate resource, as shown in the following sections. In this example, the name of the SSL certificate resource is `www-ssl-cert`.
- [Creating
a Google-managed SSL certificate resource](https://docs.cloud.google.com/load-balancing/docs/ssl-certificates/google-managed-certs#create-ssl)
- [Creating
a self-managed SSL certificate resource](https://docs.cloud.google.com/load-balancing/docs/ssl-certificates/self-managed-certs#createresource)
2. For HTTPS, create a target HTTPS proxy to route requests to your URL
map. The proxy is the portion of the load balancer that holds the SSL certificate
for an HTTPS load balancer, so you also load your certificate in this step.
```
gcloud compute target-https-proxies create https-lb-proxy \
--url-map=web-map-https \
--ssl-certificates=www-ssl-cert
```
3. For HTTPS, create a global forwarding rule to route incoming requests to the proxy.
```
gcloud compute forwarding-rules create https-content-rule \
--load-balancing-scheme=EXTERNAL \
--network-tier=PREMIUM \
--address=lb-ipv4-1 \
--global \
--target-https-proxy=https-lb-proxy \
--ports=443
```
4. Optional: For HTTPS, create a global SSL policy and attach it to the HTTPS proxy.
To create a global SSL policy:
```
gcloud compute ssl-policies create my-ssl-policy \
--profile MODERN \
--min-tls-version 1.0
```
To attach the SSL policy to the global target HTTPS proxy:
```
gcloud compute target-https-proxies update https-lb-proxy \
--ssl-policy my-ssl-policy
```
**Set up an HTTP frontend**
Skip this section for HTTPS load balancers.
1. For HTTP, create a target HTTP proxy to route requests to your URL map.
```
gcloud compute target-http-proxies create http-lb-proxy \
--url-map=web-map-http
```
2. For HTTP, create a global forwarding rule to route incoming requests to the proxy.
```
gcloud compute forwarding-rules create http-content-rule \
--load-balancing-scheme=EXTERNAL \
--address=lb-ipv4-1 \
--global \
--target-http-proxy=http-lb-proxy \
--ports=80
```
### Terraform
1. To create the health check, use the [`google_compute_health_check`](https://registry.terraform.io/providers/hashicorp/google/latest/docs/resources/compute_health_check) resource.
```terraform
resource "google_compute_health_check" "default" {
name = "http-basic-check"
check_interval_sec = 5
healthy_threshold = 2
http_health_check {
port = 80
port_specification = "USE_FIXED_PORT"
proxy_header = "NONE"
request_path = "/"
}
timeout_sec = 5
unhealthy_threshold = 2
}
```
2. To create the backend service, use the [`google_compute_backend_service`](https://registry.terraform.io/providers/hashicorp/google/latest/docs/resources/compute_backend_service) resource.
This example uses `load_balancing_scheme="EXTERNAL_MANAGED"`,
which sets up a global external Application Load Balancer with
[advanced
traffic management capability](https://docs.cloud.google.com/load-balancing/docs/https/traffic-management-global).
To create a classic Application Load Balancer, make sure you change the
`load_balancing_scheme` to `EXTERNAL` before
running the script.
```terraform
resource "google_compute_backend_service" "default" {
name = "web-backend-service"
connection_draining_timeout_sec = 0
health_checks = [google_compute_health_check.default.id]
load_balancing_scheme = "EXTERNAL_MANAGED"
port_name = "http"
protocol = "HTTP"
session_affinity = "NONE"
timeout_sec = 30
backend {
group = google_compute_instance_group_manager.default.instance_group
balancing_mode = "UTILIZATION"
capacity_scaler = 1.0
}
}
```
3. To create the URL map, use the [`google_compute_url_map`](https://registry.terraform.io/providers/hashicorp/google/latest/docs/resources/compute_url_map) resource.
```terraform
resource "google_compute_url_map" "default" {
name = "web-map-http"
default_service = google_compute_backend_service.default.id
}
```
4. To create the target HTTP proxy, use the [`google_compute_target_http_proxy`](https://registry.terraform.io/providers/hashicorp/google/latest/docs/resources/compute_target_http_proxy) resource.
```terraform
resource "google_compute_target_http_proxy" "default" {
name = "http-lb-proxy"
url_map = google_compute_url_map.default.id
}
```
5. To create the forwarding rule, use the [`google_compute_global_forwarding_rule`](https://registry.terraform.io/providers/hashicorp/google/latest/docs/resources/compute_global_forwarding_rule) resource.
This example uses `load_balancing_scheme="EXTERNAL_MANAGED"`,
which sets up a global external Application Load Balancer with
[advanced
traffic management capability](https://docs.cloud.google.com/load-balancing/docs/https/traffic-management-global).
To create a classic Application Load Balancer, make sure you change the
`load_balancing_scheme` to `EXTERNAL` before
running the script.
```terraform
resource "google_compute_global_forwarding_rule" "default" {
name = "http-content-rule"
ip_protocol = "TCP"
load_balancing_scheme = "EXTERNAL_MANAGED"
port_range = "80-80"
target = google_compute_target_http_proxy.default.id
ip_address = google_compute_global_address.default.id
}
```
To learn how to apply or remove a Terraform configuration, see
[Basic Terraform commands](https://docs.cloud.google.com/docs/terraform/basic-commands.md.txt).
## Connect your domain to your load balancer
After the load balancer is created, note the IP address that is associated with
the load balancer---for example, `30.90.80.100`. To point your domain to your
load balancer, create an `A` record by using your domain registration service. If
you added multiple domains to your SSL certificate, you must add an `A` record
for each one, all pointing to the load balancer's IP address. For example, to
create `A` records for `www.example.com` and `example.com`, use the following:
```
NAME TYPE DATA
www A 30.90.80.100
@ A 30.90.80.100
```
If you use Cloud DNS as your DNS provider, see
[Add, modify, and delete records](https://docs.cloud.google.com/dns/docs/records.md.txt).
## Test traffic sent to your instances
Now that the load balancing service is running, you can send
traffic to the forwarding rule and watch the traffic be dispersed to different
instances.
### Console
1. In the Google Cloud console, go to the **Load balancing** page.
[Go to Load balancing](https://console.cloud.google.com/networking/loadbalancing/)
2. Click the load balancer that you just created.
3. In the **Backend** section, confirm that the VMs are healthy. The
**Healthy** column should be populated, indicating that both VMs
are healthy (`2/2`). If you see otherwise, first try reloading
the page. It can take a few moments for the Google Cloud console to
indicate that the VMs are healthy. If the backends do not appear healthy
after a few minutes, review the firewall configuration and the network tag
assigned to your backend VMs.
4. For HTTPS, if you are using a Google-managed certificate, confirm that your certificate resource's status is ACTIVE. For more information, see [Google-managed SSL certificate resource status](https://docs.cloud.google.com/load-balancing/docs/ssl-certificates/google-managed-certs.md.txt#certificate-managed-status).
5. After the Google Cloud console shows that the backend instances are healthy, you can test your load balancer using a web browser by going to `https://IP_ADDRESS` (or `http://IP_ADDRESS`). Replace `IP_ADDRESS` with the [load balancer's IP address](https://docs.cloud.google.com/load-balancing/docs/https/ext-https-lb-simple.md.txt#ip-address).
6. If you used a self-signed certificate for testing HTTPS, your browser displays a warning. You must explicitly instruct your browser to accept a self-signed certificate.
7. Your browser should render a page with content showing the name of the instance that served the page, along with its zone (for example, `Page
served from: lb-backend-example-xxxx`). If your browser doesn't render this page, review the configuration settings in this guide.
### gcloud
```
gcloud compute addresses describe lb-ipv4-1 \
--format="get(address)" \
--global
```
After a few minutes have passed, you can test the setup by running the following
`curl` command.
```
curl http://IP_ADDRESS
```
-OR-
```
curl https://HOSTNAME
```
## What's next
- To set up an HTTP-to-HTTPS redirect for your classic Application Load Balancer, see [Setting up an HTTP-to-HTTPS redirect for
classic Application Load Balancers](https://docs.cloud.google.com/load-balancing/docs/https/setting-up-http-https-redirect)
- For a complex example with IPv6 and multi-region load balancing, see [Setting up an HTTPS load
balancer](https://docs.cloud.google.com/load-balancing/docs/https/setting-up-https).
- [Clean up the load balancer setup](https://docs.cloud.google.com/load-balancing/docs/cleaning-up-lb-setup.md.txt).
- To enable IAP, see [Enabling IAP on the
external Application Load Balancer](https://docs.cloud.google.com/iap/docs/load-balancer-howto#enable-iap).
- To use a Terraform module, see [Terraform module examples for
external Application Load Balancers](https://docs.cloud.google.com/load-balancing/docs/https/ext-http-lb-tf-module-examples).